
ActiveCampaign is one of the best CRM, marketing, & email platforms on the market today. Their built-in forms are pretty good – but sometimes, you need more options.
In this article, we’re going to show you how to integrate ActiveCampaign with WordPress forms. We’ll introduce you to a WordPress form builder with undoubtedly the best ActiveCampaign addon out there.
We’re talking about WPForms that has the best built-in integration. Using it, you can connect your WordPress forms to ActiveCampaign in seconds and automatically send data from your forms to your ActiveCampaign account & email lists.
- What is ActiveCampaign?
- Why should you Create an ActiveCampaign Form in WordPress?
- How to Create ActiveCampaign Forms in WordPress?
What is ActiveCampaign?
ActiveCampaign is an email marketing & marketing automation tool with built-in sales tracking and CRM features. But let’s face it, if you are here, you would’ve already known that.
However, ActiveCampaign isn’t just for email marketing. You can use ActiveCampaign with a whole host of other things, such as the sales department, CRM systems, and messaging.
Web forms are the starting point for a lot of automation. So as much as we love ActiveCampaign, their forms are a bit light in terms of options. No worries, though, today we’ll show you how to overcome that challenge completely.
Why should you Create an ActiveCampaign Form in WordPress?
ActiveCampaign is an email marketing service that lets you build a relationship with your customer and leads. Using WPForms, you can connect ActiveCampaign with WordPress to start creating & putting your forms on your website.
Some of the benefits of integrating WPForms with ActiveCampaign are:
- Easy to Use: You can easily create a fantastic form in just a few clicks right from your WordPress dashboard with a drag & drop builder.
- No need to log into ActiveCampaign: You have to integrate once, and you can create unlimited signup forms with WordPress.
- Add a Subscription Checkbox: Do you want to allow users to automatically subscribe to your list when they submit a contact form? Then you have to add a subscription checkbox to your contact form with smart conditional logic.
So now, you get an idea of why you should use ActiveCampaign with WPForms. Let’s take a look at exactly how to create an ActiveCampaign form in WordPress.
How to Create ActiveCampaign Forms in WordPress?
Here is a step-by-step guide to getting your ActiveCampaign form up and running on your WordPress website.
Step 1: Activate the ActiveCampaign Addon
Before you turn on the ActiveCampaign addon, the first thing you need to do is to activate and install the WPForms plugin & signup for WPForms Elite.
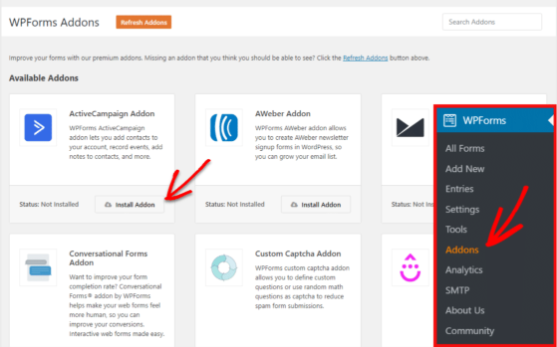
The next thing you’ll need to do is to activate the ActiveCampaign addon. Go to WPForms > Addons and locate the ActiveCampaign addon. Then click on install Addon.
You will see the status of the addon change to Active once completed.
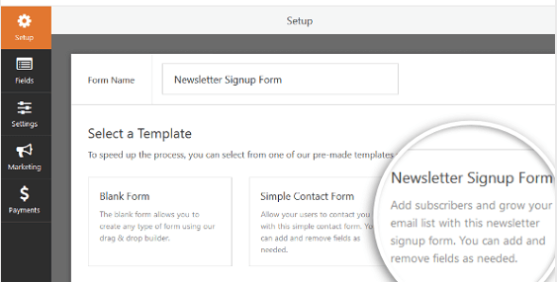
Step 2: Build Your Form
After the installation process, create a form by going to WPForms > Add New. On the setup screen, name your form & select the Newsletter Signup Form Template. WPForm will automatically create a simple newsletter signup form.
You can also add some additional fields by dragging them from the left-hand panel to the right-hand panel. Then, click on the field to make any changes.
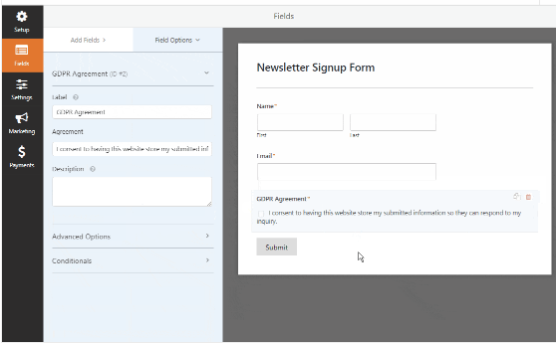
You can also click on a form field & drag it up or down to rearrange the order on your ActiveCampaign subscribe form.
One of the vital form fields to consider adding to your ActiveCampaign signup form is the GDPR Agreement Field.
This form enables you to create GDPR compliant forms by giving your site visitors a way to agree to storing their personal information & sending their marketing emails.
For changing the agreement field’s default language, all you need to do is click on the field to make changes.
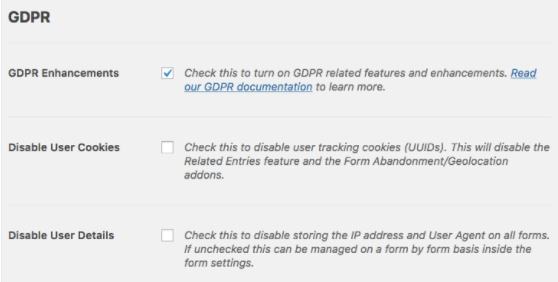
And if you want to add the GDPR Agreement field to your subscribe form, you’ll need to go to WPForms > Settings and then click on the GDPR Enhancements checkbox. This will enable the GDPR enhancements features.
You’ll be able to:
- Disable user details, which include IP addresses & User-Agent data
- Disable user cookies
- Access to GDPR form field for your WordPress forms
After completing the customization process, click Save.
Now let’s look at how to connect your ActiveCampaign form in WordPress to your email marketing provider.
Step 3: Connect Your Form to ActiveCampaign
If you want to connect your form to ActiveCampaign, click on the Marketing tab on the left side, and then click on ActiveCampaign.
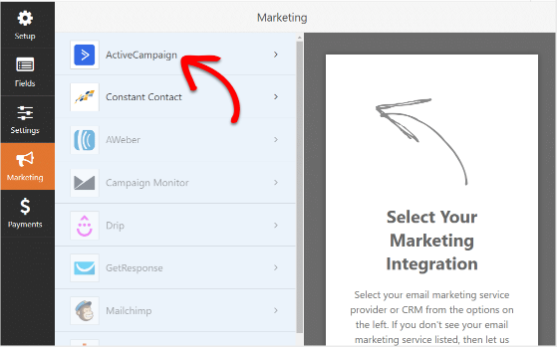
Then click on Add New Account. You will see a new window on your screen; add ActiveCampaign information in the form. Here’s the way you can complete each field.

ActiveCampaign Account Name
In this particular field, you can add any name you’d like. It’s for your internal use only and will be more helpful if you add more than one ActiveCampaign account.
ActiveCampaign API URL and Key
Each ActiveCampaign account will be its unique API. To find an API, you will first need to log into your ActiveCampaign account.
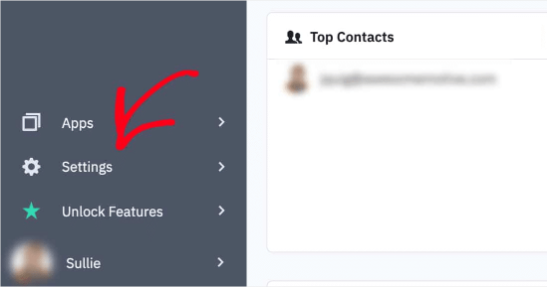
When you logged into your account, click on the Settings option (near the left sidebar). You will see an additional menu appearing on the sidebar; within the given menu, click on Developer.
On this screen, you can copy both the key and the URL into the window on WPForms.
Well done! Your WPForms account is now successfully connected to your ActiveCampaign forms in WordPress. Let’s move on to the next important step.
Step 4: Set Up Your ActiveCampaign Form
In the popup that appears on the screen, enter a nickname for this form (something like Newsletter SignUp will work) and click OK. No one else will see this nickname; you’re the only one who will see this.
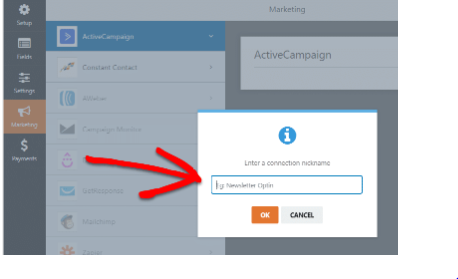
This nickname will be handy if you want to connect this form to multiple email lists.
Now, more settings will show up.
- Select Account: You can choose from any of the ActiveCampaign accounts you’ve connected.
- Action to Perform: This is where you will select the action you want to be taken when the user fills out this form. The option which is selected here will also tell us about which additional settings are displayed.
Under Select Account, select your account under Action To Perform and choose an appropriate subscriber: Create or Update. Now, complete the remaining fields that populate.
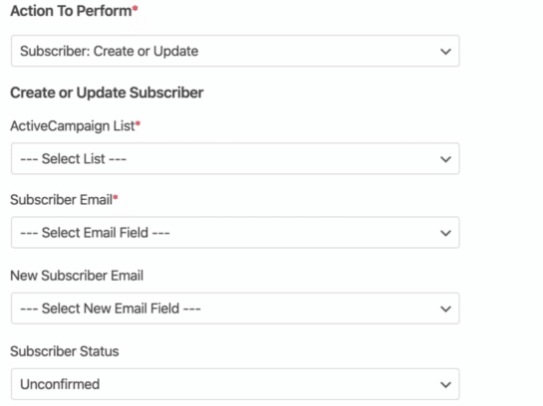
Some more details on each field:
- ActiveCampaign List: Select from your available mailing lists. If you don’t have a list yet, check out ActiveCampaign’s doc to create the list.
- Subscriber Email: Select an email field from your form. And if you’re updating an existing subscriber, choose the email field from your form that includes the updated email address.
- Subscriber Status: This status will be automatically assigned to all subscribers with the help of this form.
Click on the Save button in the top right corner.
Great! Your form has been created. The last step is to add your ActiveCampaign form to your WordPress website.
Step 5: Add Your ActiveCampaign Form to Your WordPress Website
With the help of WPForms, you can easily add your newsletter signup form to your pages, blog posts, and even sidebar widgets.
For embedding a form into a page, first, create a new post or page in WordPress, or you can also update one that you’ve previously created.
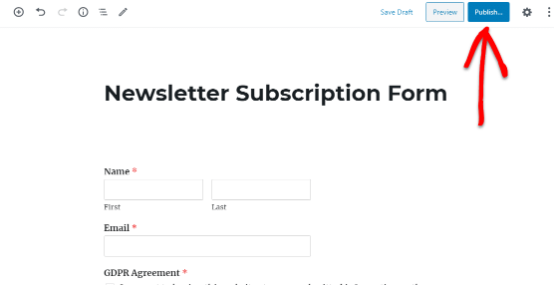
Next, you need to click inside the first block and then type in WPForms in the search bar. You will see the WPForms icon come up.
Then, click on the Add WPForms icon & from the dropdown that appears, select your Newsletter Subscription Form. Next, go ahead and click Publish or Update on your page to have your form go live.
Congrats! You did it. Your ActiveCampaign form is now live on your WordPress website. Well-done.
Final Thoughts
Now anytime a new user fills out your form, he will be added to your new contact in the ActiveCampaign database along with other fields you have specified. This way, you can keep in touch with email marketing.
So what are you waiting for? Get started with the best WordPress forms plugin today. The WPForms Elite plan gives access to the ActiveCampaign addon.
If you have any questions related to ActiveCampaign integration with WordPress, then you can tell us in the comment section below. If you like this article, then don’t forget to share it on Social Media.
Happy Reading!
