Holding the lion’s share of the cloud-computing market at 41.5%, Amazon Web Service (AWS) is the most popular cloud-computing service nowadays. It allows businesses and individuals to host their applications and websites on Amazon’s servers cheaply.
One of the critical components of AWS is Amazon CloudFront. It’s a content delivery network (CDN) built to maximize the loading speed of any visitor to your AWS-hosted website.
But do you know that you can use CloudFront to lock down your website behind a password prompt? This guide will show you how to use the AWS CloudFront password protect feature to secure your website.
What Is CloudFront Password Protect?
Amazon CloudFront speeds up users’ access to your application and website by delivering content through various data centers worldwide. When a user accesses your website, the content is delivered from the center closest to his geographical position. This, as a result, speeds up the loading speed.
So long as you use Amazon CloudFront to distribute content, you can use the system’s password protection feature. The system still works if your website is hosted inside an S3 bucket or an EC2 instance.
Here’s the schematic of a standard CloudFront system. It describes how a request from the web visitors (to the right) flows through CloudFront and other subsystems to arrive at the origin (where the content is stored). At the origin, data is retrieved and flows back to the visitors.
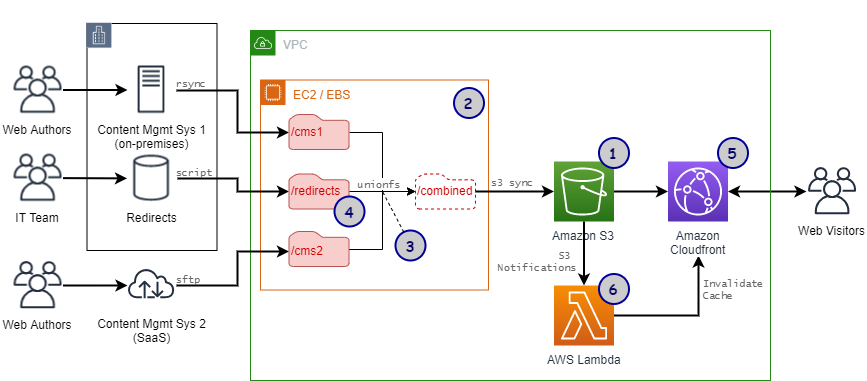
It may look confusing, especially for people who have just heard of CloudFront for the first time. But understanding this chart and its components is crucial for later sections.
How to Secure a CloudFront Website with a Password
You can use several methods to push a password prompt onto your CloudFront-served website. We’ll show you 2 ways in this guide.
Using Lambda@Edge
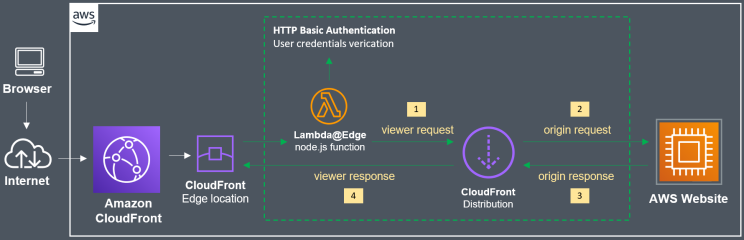
Lambda@Edge is a feature of CloudFront that allows you to run custom codes closer to the customers. That way, loading performance is improved. If you choose to deploy Lambda@Edge, whenever a visitor requests to retrieve content for your website, they’ll have to go through this function first.
If you were to modify Lambda@Edge to work only if the user provides a correct password, you more or less have a password protection layer for your website.
That’s the basic idea behind this CloudFront security method.
Step 1: Deploy the Lambda@Edge Function
Lambda@Edge is a Lambda function that’s deployed only in the us-east-1 region (North Virginia). So, to deploy it, you’ll have to log into the right region:
- Sign into your AWS account, then click on Create Function.
- You’ll be prompted to enter the name of the function. Choose something basic like BasicAuth. As runtime, pick Node.js 12.x.
- Finalize the creation by pressing the Create Function button.
- You’ll now see a file called index.js in the Function Code window. Click on it, and you’ll see a default Lambda Code. Replace it with this custom code:
'use strict';

exports.handler = (event, context, callback) => {

// authentication credentials
var i = 0, authStrings = [], authCredentials = [
'user1:userpassword',
];

// construct Basic Auth strings
authCredentials.forEach(element => {
authStrings[i] = "Basic " + new Buffer(element).toString('base64');
i++;
}
);

// get request and request headers
const request = event.Records[0].cf.request;
const headers = request.headers;

// require Basic authentication
if (typeof headers.authorization == 'undefined' ||
!authStrings.includes(headers.authorization[0].value)) {

const response = {
status: '401',
statusDescription: 'Unauthorized',
body: 'Unauthorized',
headers: {
'www-authenticate': [ {key: 'WWW-Authenticate',
value: 'Basic realm="Authentication"'} ]
},
};

callback(null, response);
}

// continue request processing if authentication passed
callback(null, request);
};
The default login credential is stored in this function in the line:
'user1:userpassword',
The format is “account:password”. You can change it to whatever you want. Plus, you can also add more login credentials by duplicating this line.
5. Once the custom code has been replaced, click on Deploy to push the code.
6. Navigate to the Actions menu at the top, click on Publish New Version, then select Publish. Don’t change any settings there.
7. Locate the ARN string at the top-right of the screen and copy it. This step is crucial. The ARN string looks like this:
arn:aws:lambda:us-east-1:XXXXXXXXXXXX:function:basicAuth:1
Step 2: Set Up the Trust Relationship
- Go to IAM Console and login.
- Enter the name of your Lambda@Edge function (BasicAuth in the previous step).
- Find the Trust relationships tab and click on Edit. Replace the code inside with this:
{
"Version": "2012-10-17",
"Statement": [
{
"Effect": "Allow",
"Principal": {
"Service": [
"lambda.amazonaws.com",
"edgelambda.amazonaws.com"
]
},
"Action": "sts:AssumeRole"
}
]
}
4. Finalize the process by clicking on Update Trust Policy.
Step 3: Configure the Cache Behavior
- Go to CloudFront and log in. Click on the CloudFront-served website that you’d like to lock down with a password.
- Choose Behaviors, find the URL Path Pattern checkbox, and check it. Continue to click on Edit.
- Find a section called Lambda Function Associations. Find a scroll-down menu and search for Select Event Type, then Viewer Request. Paste the ARN string you copied earlier in step 1.
- Hit on Yes, Edit. After this, CloudFront will take about 5 minutes to reboot and reload the new settings.
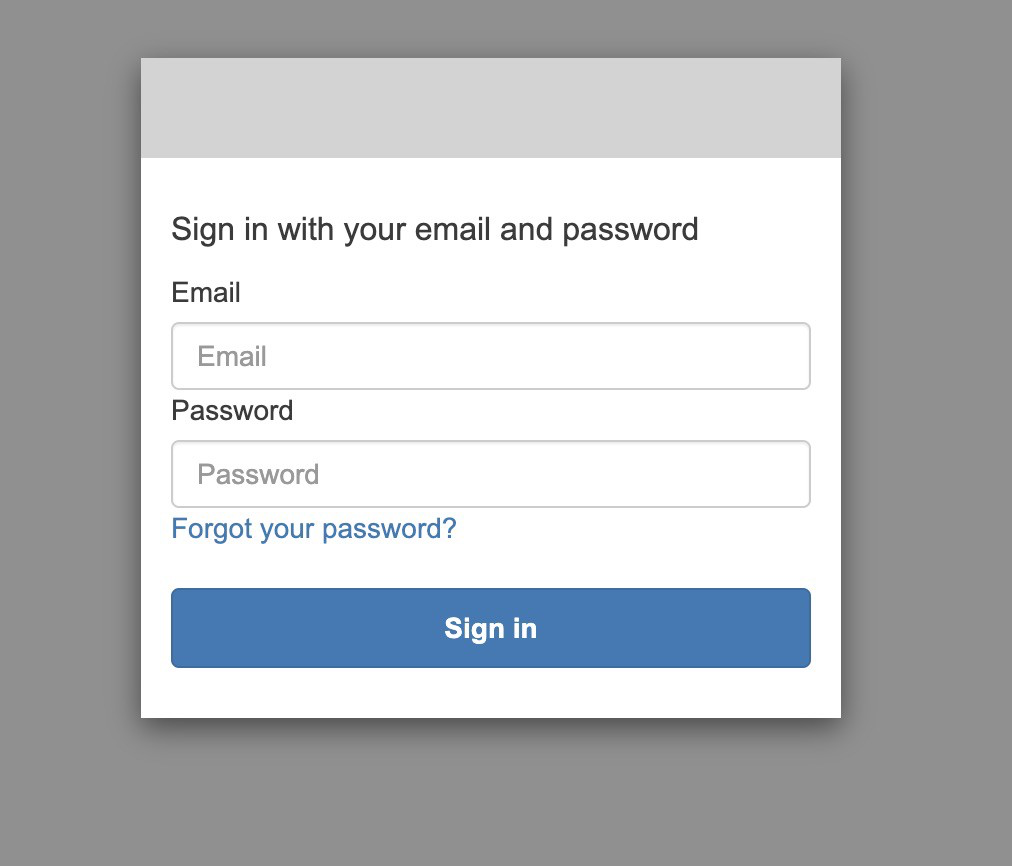
Step 4: Recheck the Website
Visit your website after CloudFront has rebooted. If you’re greeted with a login prompt, you’ve succeeded.
It should look something like this:
Leveraging AWS S3 and Lambda to Add Basic Authentication
In this method, we’ll use a combined approach of AWS S3 and Lambda to accomplish the same thing as we did above: make a basic authentication form for the website.
Step 1: Create an S3 Bucket
AWS S3 (Simple Storage Service) is AWS’ cloud storage solution. It gives you the ability to store any kind of data on Amazon’s servers. In S3, a “bucket” contains and controls access to objects (your content’s data).
- You can create a bucket through AWS Management Console. Click on the S3 tab and then Create bucket.
- Enter the name and hosting region (pick the one closest to you for easier testing). Click Create, and that’s it!
Step 2: Make a Test File
- Create a test file like a simple index.html file with the starter code in it.
<h2>Hello World</h2>
2. You can upload this file to the newly-created bucket via the Objects menu.
Step 3: Generate a CloudFront Distro
- Navigate to CloudFront’s dashboard and press on Create distribution.
- Choose the Origin domain as the S3 bucket you had just created. Update the bucket’s policy and OAI (Origin Access Identity) setting to your liking.
- Enter the name of the file you wish to protect (index.html) into the optional Default root object box.
- Create the CloudFront distribution and voilà! You now have a CloudFront endpoint.
Step 4: Create a Custom Lambda Function
- Now, from your AWS Management Console, navigate to the Lambda tab and press on Create function.
- Select the Use a blueprint option and search for CloudFront, then choose the CloudFront-response-generation template. Click on Configure once you’ve selected it.
- In the next screen, enter the name of the function (AuthenticationTest) and the role name (S3-Auth). Choose Execution Role as Create the new role from AWS Policy templates.
- Next, paste the details of the CloudFront endpoint you just created into the Distribution box. In Cache behavior, leave it as *. And lastly, in CloudFront event, select Viewer request.
- Click on Deploy to create the new function.
Step 5: Modify the Lambda Function
- Replace the default Lambda code with this custom code.
'use strict';
exports.handler = (event, context, callback) => {

// Get request and request headers
const request = event.Records[0].cf.request;
const headers = request.headers;

// Configure authentication
const authUser = 'username';
const authPass = 'password';

// Construct the Basic Auth string
const authString = 'Basic ' + new Buffer(authUser + ':' + authPass).toString('base64');

// Require Basic authentication
if (typeof headers.authorization == 'undefined' || headers.authorization[0].value != authString) {
const body = 'Unauthorized';
const response = {
status: '401',
statusDescription: 'Unauthorized',
body: body,
headers: {
'www-authenticate': [{key: 'WWW-Authenticate', value:'Basic'}]
},
};
callback(null, response);
}

// Continue request processing if authentication passed
callback(null, request);
};
You can change the username and password to suit your liking.
2. Click on Deploy at the top to save the code. Then, go to Actions and Deploy to Lambda@Edge to push the code.
3. Paste the CloudFront endpoint address to the Distribution box, leave Cache behavior as *, and select CloudFront event as Viewer request. Once done, a new CloudFront trigger will be created.
4. Then, deploy it and wait for 5 minutes.
5. Visit your website again. It should now present you with a login prompt, courtesy of the CloudFront authentication system.
Make Full Use of the CloudFront Password Protect Feature
There are many reasons why a web admin would want to lock down their website. It could be because their website needs maintenance, enhanced security, or protection against unauthorized access.
Whatever the case, hope this guide can help you successfully deploy a password scheme using the CloudFront password protect.
There is another way to password protect a website: using PPWP Pro. Check it out!
