
Creating a WordPress membership website proves the sure-fire way to effectively monetize your expert knowledge. While you can certainly use a feature-packed membership plugin to set up your membership site, it can be overkill in case you just need a small-scaled site.
In this article, we’ll show you how to create a simple WordPress membership site using the password-protection method. You don’t need to waste time configuring user accounts or membership upgrade rules.
Let’s get the ball rolling!
- Get Ready With Required Plugins
- 2 Ways to Create a WordPress Membership Site with PPWP Pro
- How to Create Multiple Membership Levels
- Protect Digital Products with PDA Gold
Get Ready With Required Plugins
Since we’ll be creating a simple WordPress membership site with PPWP Pro, you need to have some of these plugins and extensions installed and activated on your site.
Why some of these? Because we’ll present 2 different ways to build membership sites. You can base on your preferred methods and download the corresponding tools.
- PPWP Lite: to make sure PPWP Pro functions well.
- PPWP Pro: to build a membership site with passwords
- Group Password Protection: to set up a multi-level membership
- Form Integration: to let users register to your membership site via form submissions
- PDA Gold extension: to secure your digital products, such as media files, ebooks, and PDF, etc.
2 Ways to Create a WordPress Membership Site with PPWP Pro
Here are 2 common ways that site owners usually use to create WordPress membership sites with membership plugins.
The first method is to set up user accounts then send the usernames and passwords to members via emails. Members refer to the info given, log in to the membership site, and access the restricted content.
Considering the process of creating accounts for each member wastes so much time, we make use of PPWP Pro to simplify that process. Our plugin will help you auto-generate passwords for unlimited members. All you need to do is send the passwords to their emails.
Regarding the second method, site owners will create a form for membership registration. Once users submit that form, they become members, getting access to the private content.
In this tutorial, we’ll also build a simple WordPress site that follows this method, using our form integration extension.
#1. Build Membership Sites with Password Protection
Tools needed: PPWP Lite, PPWP Pro.
Password Protect Your Private Content
- Log in to your WordPress dashboard, go to the Password Protect WordPress section.
- Enable the Password Protect Private Pages option in the plugin Settings page. This allows you to lock many different pages and posts.
- Choose the pages and posts you want to set private from a dropdown menu.
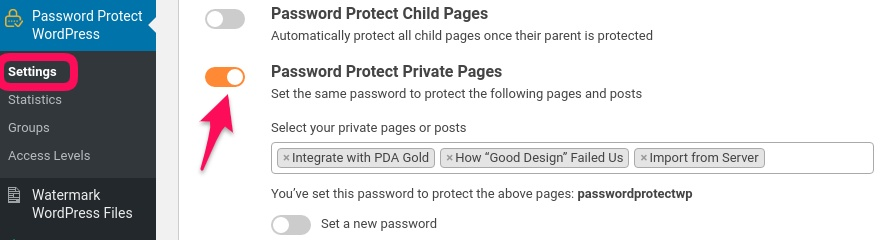
- Set your own password.
- Save your settings.
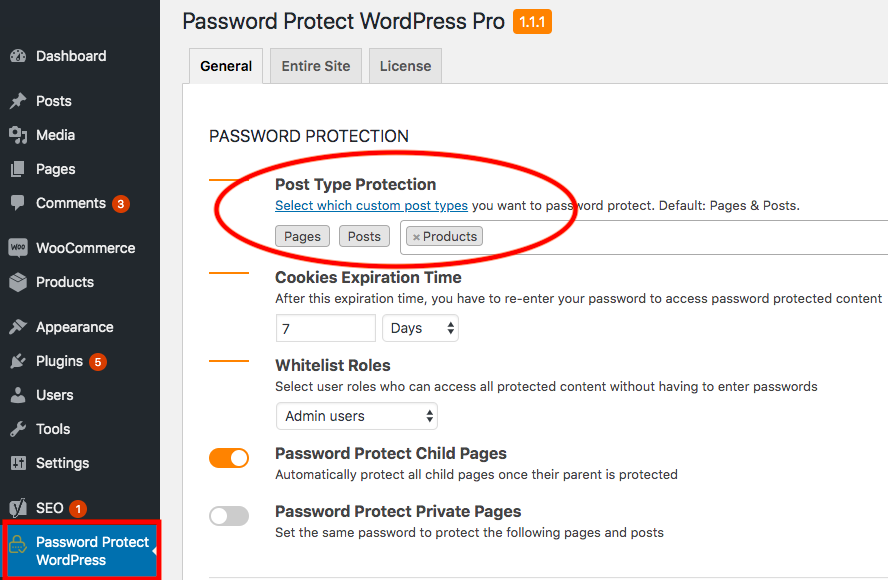
In case you run an eCommerce membership site and want to lock certain product pages selling premium products for VIP members only, PPWP Pro can help you with that too.
- In the Password Protect WordPress settings, under the Post Type Protection section, select Products.
- Save your changes.
- Head to your Products and assign passwords to your desired pages.
Send Passwords via Emails
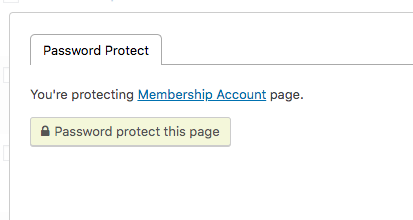
Once setting passwords for private content, you can send them to your members via emails.
As a result, members can enter the given passwords to access your restricted content now.
#2. Set up Membership Site via Form Submissions
Tools needed: PPWP Lite, PPWP Pro, Forms Integration extension
The great thing about setting up a WordPress membership site via form submission is it frees you from manually sending emails containing passwords to users.
After form submission, your customer will receive either a quick access link (QAL) or a password letting them access membership content directly. More than that, you have full control over your QALs, i.e. get them expired after a given time or a number of clicks automatically.
Our Forms Integration extension supports Contact Form 7 and Gravity Form. We assume that you have already created a form on your site.
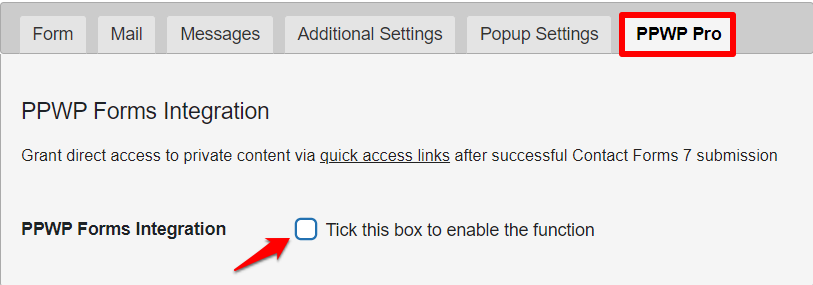
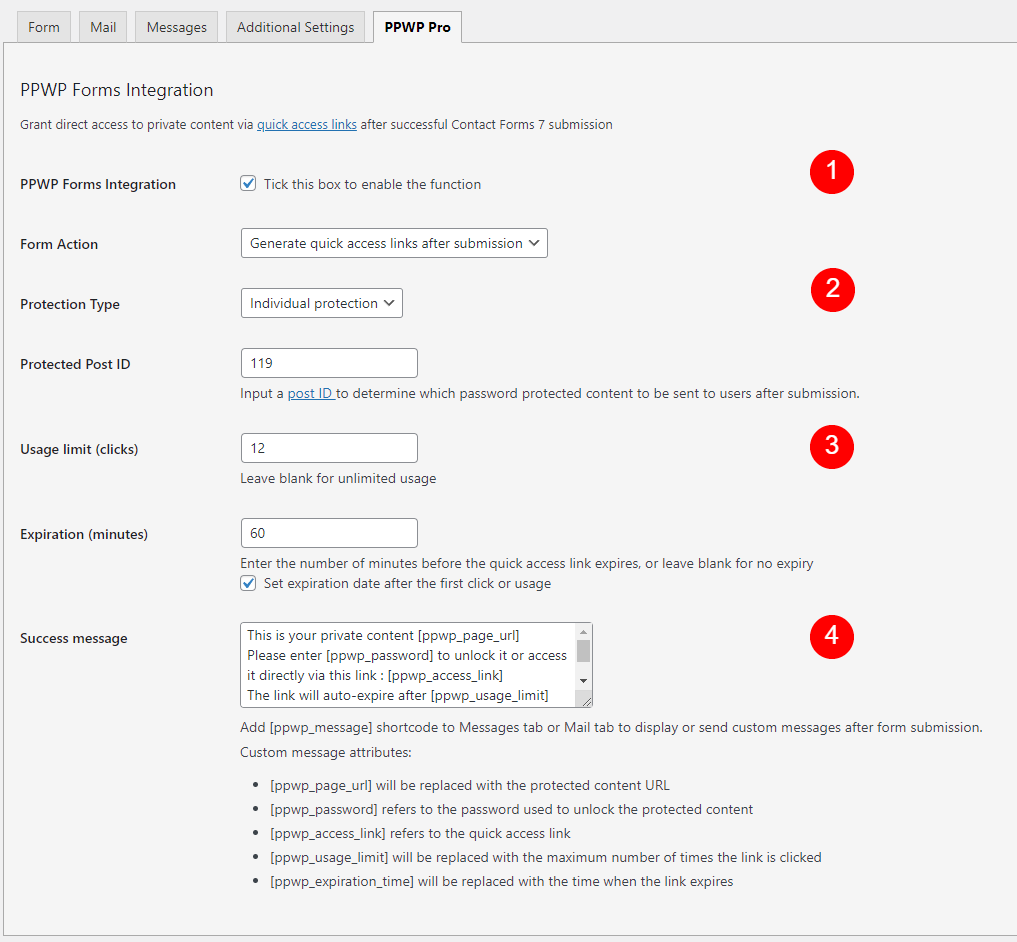
- In your WordPress admin dashboard, navigate to Forms (if you use Gravity Form) or Contact (if you use Contact Form 7) and click on the form that you want to create a quick access link for.
- Head to Settings and click on PPWP Pro. Check the “Tick this box to enable the function” option.
- In Form Action, choose “Generate quick access link after submission.”
- Under the Protection Type section, choose Individual protection.
- Back to Pages/Posts and hover over the page/post for your premium content to get its post ID.

- Back to PPWP Forms Integration settings, fill the post ID you’ve just gotten into the Protected Post ID field.
- Define your preferred usage limits and expirations.
Now, you need to customize the email containing the QALs or passwords.
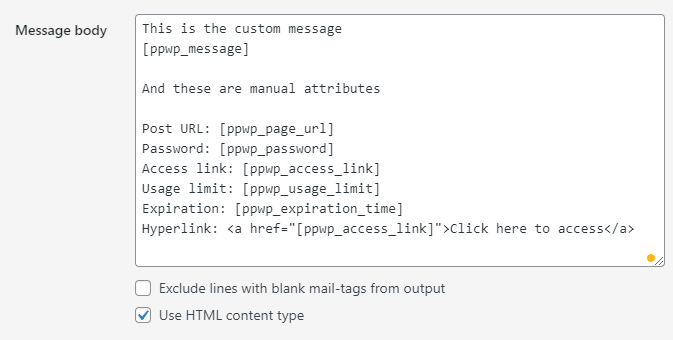
If you use Contact Form 7, switch to the Mail tab, add [ppwp_message] shortcode to the Message body field.
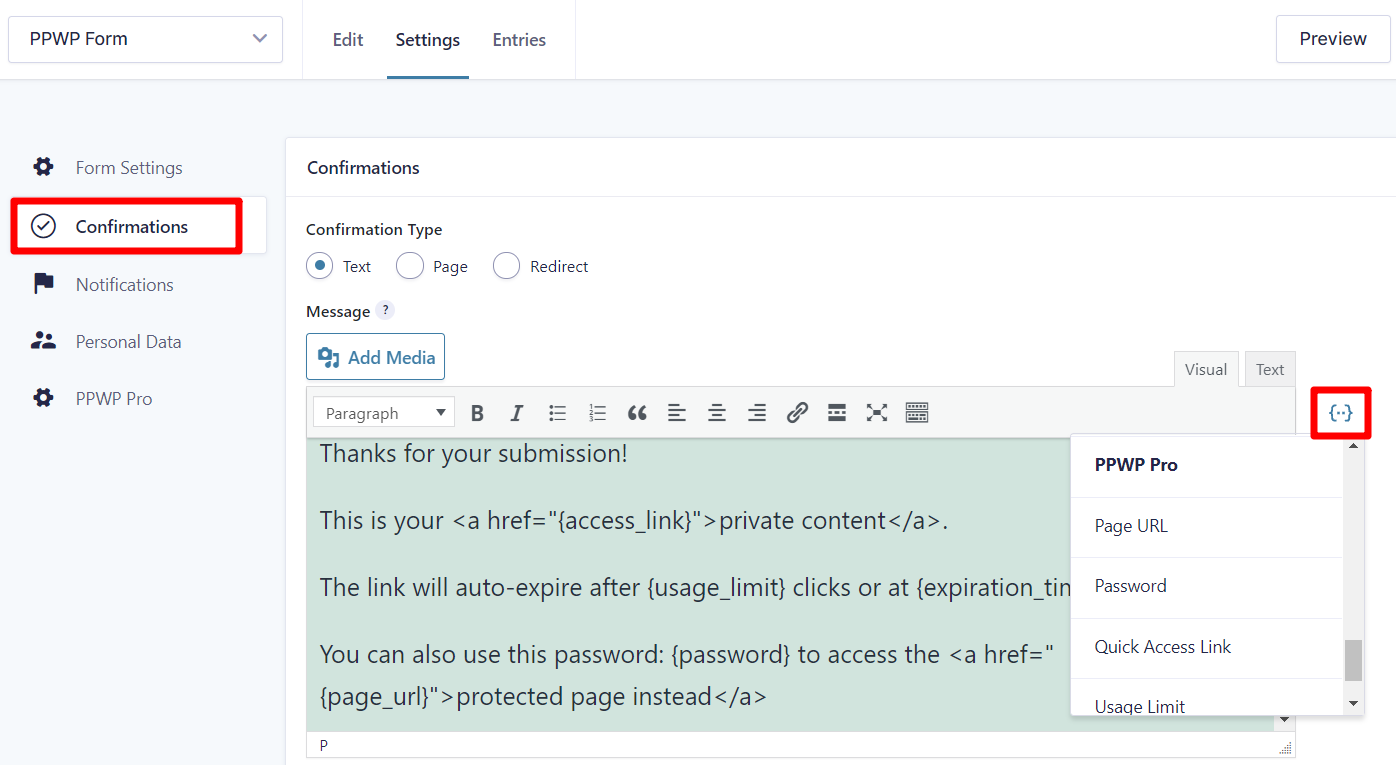
In case you use Gravity Form, you can deliver quick access links to your registers after submission via a Confirmation message or Notification email.
The following screenshot demonstrates how a custom message looks when your customer receives it.
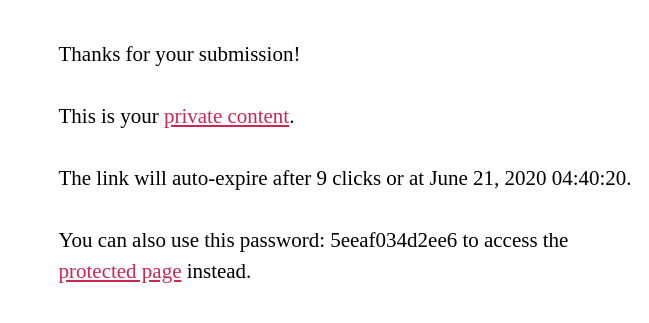
Now, they can click on the quick access link to view the protected premium content or use the password sent to unlock your WordPress membership content.
How to Create Multiple Membership Levels
You’d like to create multiple membership levels? Group Password Protection will give you a helping hand! In particular, you can gather the content based on the access levels of users. All you need to do is password protect your entire site, then group multiple content pages/posts together.
Protect The Entire Website
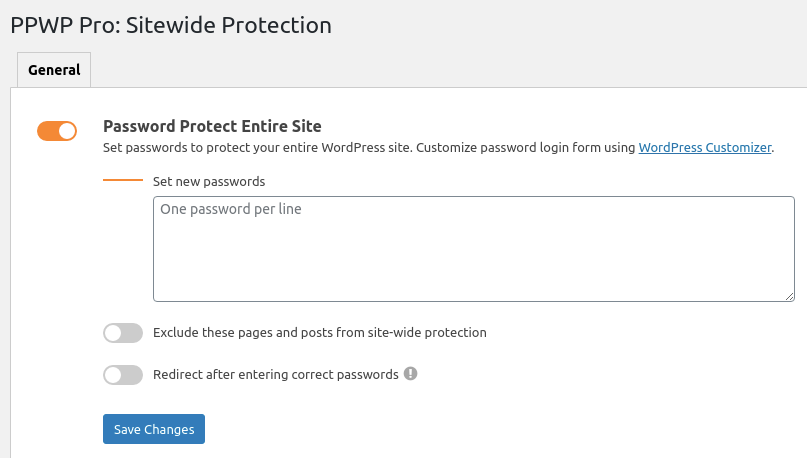
- Navigate to Password Protect WordPress > Sitewide Protection in your admin menu.
- Enable the “Password Protect Entire Site” option. You will see a text box named “Set new passwords” letting you input multiple passwords at once.
- Enter your passwords, make sure that they are spaceless and limited to 100 characters.
- Hit “Save changes.”
Group Content Together
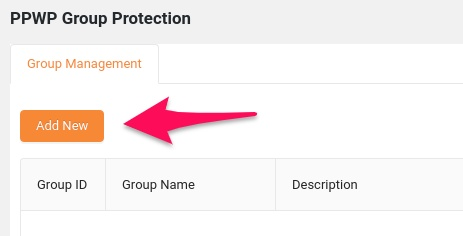
Once you successfully activate our PPWP Group Protection extension, a “Groups” submenu will show up under the Password Protect WordPress section right off the bat.
- Click on “Groups” to open a new setting screen.
- Hit the “Add New” button to create a new group.
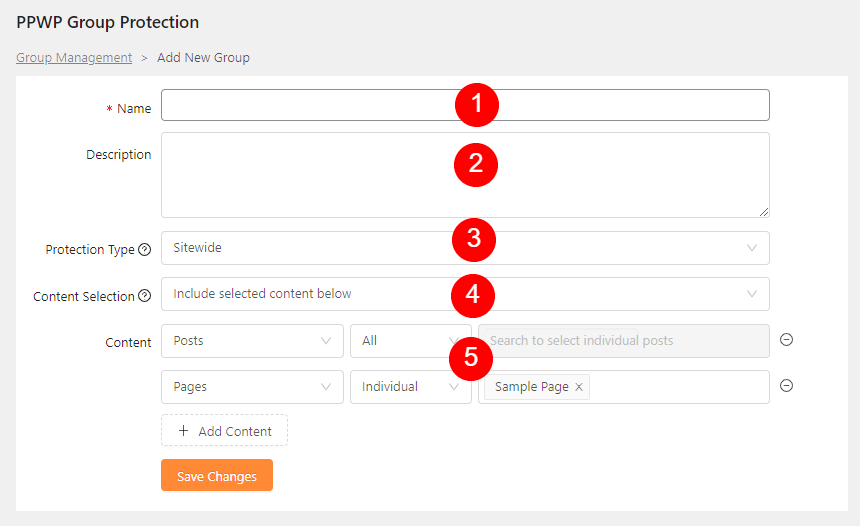
- In “Name”: enter the group name (required)
- For “Description”: fill in a group description
- In “Protection Type”: select Sitewide.
- Under “Content Selection”:
– Include selected content below: Group passwords are used to unlock the selected content.
– Exclude selected content below: Group passwords are used to unlock all content except the selected one. - In “Content”: Select content belonging to the group
- Click “Save Changes” to save your settings.
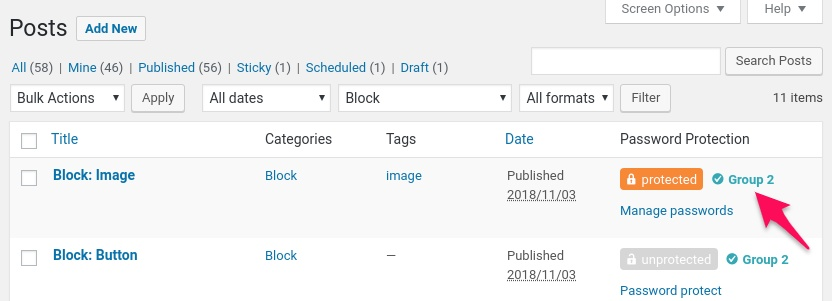
Once a post is added to a group, you will see a badge indicating which group (ID) it belongs to under the “Password Protection” column.
Notes:
- One post can belong to multiple groups.
- The search result displays up to 10 posts at a time.
- In case you can’t find a page or post, please make sure that you have entered more than 3 characters and you have selected a post type before searching.
- You can cluster the Woocommerce product as well as the custom post type.
Each group here stands for each membership level. So, it’s recommended to create different unique group passwords to easily manage each of your membership levels.
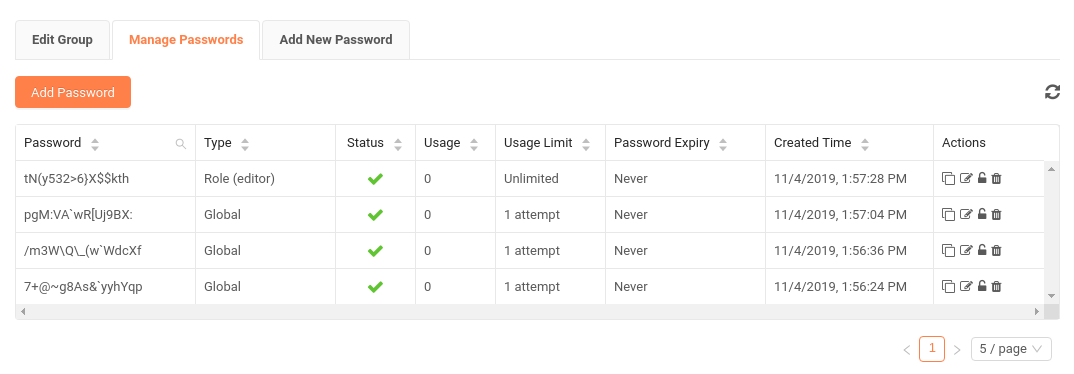
Create and Manage Group Passwords
- From the PPWP Group Protection dashboard, select the Manage link next to the group that you want to password protect.

- Move to the Add New Password tab and fill in this info before generating a password.
– New Password: input your passwords, ensure they are unique, have no space, sensitive cases, and no more than 100 characters.
– Password Type:
+ Global (default): anyone with the password can unlock the protected group content.
+ Roles: define specific user roles who can use the password to access certain membership levels.
– Usage Limit: set the maximum number of times a password can be used.
– Password Expiry: make passwords auto-expire after a given day.

- Click “Add New” and you’re redirected to the Manage Passwords tab, where you can see and manage all your created passwords.
- Send these passwords to your members according to their membership levels and you’re done.
Protect Digital Products with PDA Gold
You’re selling intangible products or posting premium eBooks and exclusive tutorial videos for “Platinum membership” on your membership site? You need to protect them from illegally downloading and sharing.
As a matter of that, even though you’re password protecting your entire site, the media files uploaded there are still indexed by search engines. The same scenario goes to the membership sites built by membership and password protection plugins as well.
Your members can still share the download links with others. And at that point, you’ll face the risk that your private premium materials will be taken advantage of. You, as the content creator, will gain no benefits or revenue from your hard work as you deserve.
Aware of this issue, we recommend you use PDA Gold to protect all of your media files. The plugin seamlessly works with PPWP Pro and other membership plugins to safeguard unlimited files, videos, audio, etc.
For the detailed guide, check out our tutorial on how to protect downloadable files in WordPress membership sites.
Create Your WordPress Membership Site with PPWP Pro Now!
This article has walked you through the comprehensive process of creating a simple WordPress membership site with PPWP Pro. The coolest thing is it liberates you from the time-consuming setup ritual, such as generating user accounts, defining membership rules for each membership level, and many others.
Besides building membership sites, you also need to pay attention to securing the media files housed on your site. PDA Gold will be a great pick, protecting your gated digital files from search indexing or content piracy.
What are you waiting for? Use PPWP Pro to build your WordPress membership site and monetize your expertise skills now!
