Trusted by a quarter of sites on the web, WordPress is considered as one of the most popular content management systems. Your site is running on WordPress? Undoubtedly, these sites have become juicy targets for hackers and cybercrimes.
Be alert! Bad people and bots can attack your website through vulnerabilities of outdated plugins, incompetent web hosting, or old versions of core and theme, etc. Besides these security risks, you should also pay extra attention to brute force attacks which appear as the most common and dangerous source of vulnerabilities.
While other types of hackers focus on vulnerabilities in software, brute force attackers aim to gain access to your site through weak passwords.
It’s the job of WordPress developers and security researchers to find out the threat and keep this huge content management system safe. However, there are so many aspects and problems they have to deal with at the same time. That’s why WordPress site owners need to take the initiative and secure their websites too.
In this article, we’ll walk you through 8 ways to save your WordPress site from brute force attacks. Before getting started, let’s get some basics out of the way.
- What is a brute force attack?
- How to stop brute force attacks
- Set strong passwords for all users accounts
- Limit login attempts in WordPress
- Insert a CAPTCHA to the WordPress login page
- Install updates of WordPress versions, plugins, and themes
- Add a firewall plugin
- Setup 2-factor authentication
- Protect your WordPress admin directory
- Limit access to wp-login.php by IP
What Is a WordPress Brute Force Attack?
WordPress brute force attack, also known as brute force cracking, refers to a password trial and error method of an automatic tool to access your website.
Hackers may use a brute force attack to obtain access to your WordPress dashboard. Once landing to the admin area, they can steal your data, install malware, or even delete everything on your site with ease.
In fact, this hacking trick is sometimes considered time-consuming since hackers or bots must try and test every password. The more complex the password is, the longer it will take them to enter the correct input.
Types of brute force attacks
There are 2 main types of brute force attacks, including Hybrid Attacks (dictionary attack) and Credential Stuffing (credential recycling)
1. Hybrid Attack
Hybrid is a common form of brute force attack with a simple operation. Bots try all possible passwords listed in a password dictionary. They will start with the often-used first and then try longer ones. If your password looks like “password”, “p4ssw0rd”, or “123456”, a brute force bot would crack it within seconds.
2. Credential Stuffing
Another type of brute force attack is credential stuffing, or credential recycling, which refers to the method of reusing usernames and passwords from other data storage to access to your site.
This method relies on the user’s habit of entering the same name and password on multiple platforms or networks. A recent study proves that 80% of people reuse their passwords in almost online platforms. Although they can remember the password effortlessly, this creates a security vulnerability to a data breach.
How to know if your site is attacked
Since bots repeatedly enter all possible usernames and passwords to your WordPress admin, you can recognize it easily by checking your log. This is an example of a brute force attack on a website:
116.110.100.209 - - [30/Sep/2019:07:31:20 -0700] "POST /wp-login.php HTTP/1.1" 302 4477 "-" "Mozilla/5.0 (Macintosh; Intel Mac OS X 10_13_6)"
116.110.100.209 - - [30/Sep/2019:07:31:22 -0700] "POST /wp-login.php HTTP/1.1" 302 4479 "-" "Mozilla/5.0 (Macintosh; Intel Mac OS X 10_13_6)"
116.110.100.209 - - [30/Sep/2019:07:31:25 -0700] "POST /wp-login.php HTTP/1.1" 302 4487 "-" "Mozilla/5.0 (Macintosh; Intel Mac OS X 10_13_6)"
116.110.100.209 - - [30/Sep/2019:07:31:29 -0700] "Mozilla/5.0 (Macintosh; Intel Mac OS X 10_13_6"
It’s clear that the 116.110.100.209 IP address tries to log into your WordPress dashboard.
How to Stop WordPress Brute Force Attack
#1 Set Strong Passwords for All Users Accounts
To get into your WordPress site, attackers must go through an admin login screen which requires a username and password. Each account needs a unique and strong password so that bots can’t guess or recycle the used passwords from other data storage.
Creating a strong password seems like a daunting task. A strong password should contain at least 8 characters with letters (both uppercase and lowercase), numbers, and special characters for example, “!”, “$”, “?”.
In addition, your passwords shouldn’t be a predictable password. Do not set your password by private information, or the name of someone close to you like your girlfriend, your pet, and your own name. An example of a super-strong password is d3lTa!Gam1m@ which combines all the necessary elements: lowercase letters, uppercase letters, numbers, special characters; and has more than 8 characters.
Since hard-to-guess passwords are sometimes difficult for you to remember, you can either jot them down or store them in password management applications.
#2 Limit Login Attempts in WordPress
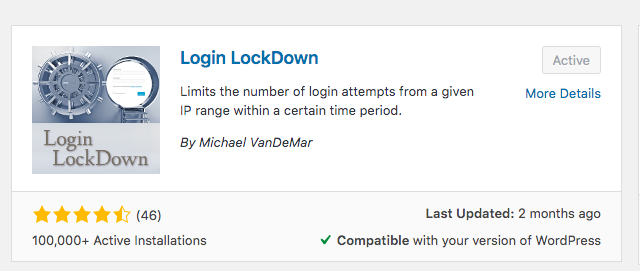
This method disallows too many wrong passwords entered to your WordPress dashboard per user in a short period of time. To get started with login attempt permission, you need to install the Login LockDown plugin. The plugin records the IP address of each unsuccessful login attempt, and will temporarily block it if the number of failed attempts in a period of time is higher than the one you set.
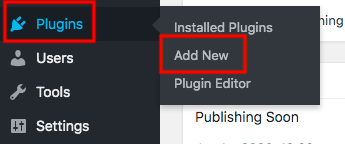
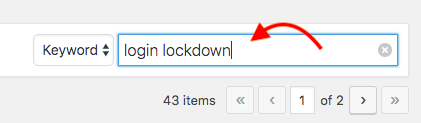
Firstly, go to Plugins → Add New in your WordPress navigation menu, search for Login LockDown in the keyword box. Then, click on the Install and Activate buttons.
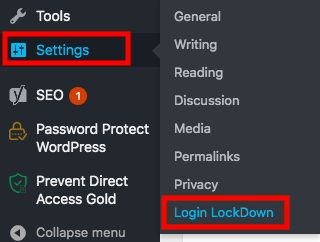
Upon installation, the plugin is immediately inserted to your Settings page in the WordPress dashboard. Click on Login LockDown to make some basic settings.
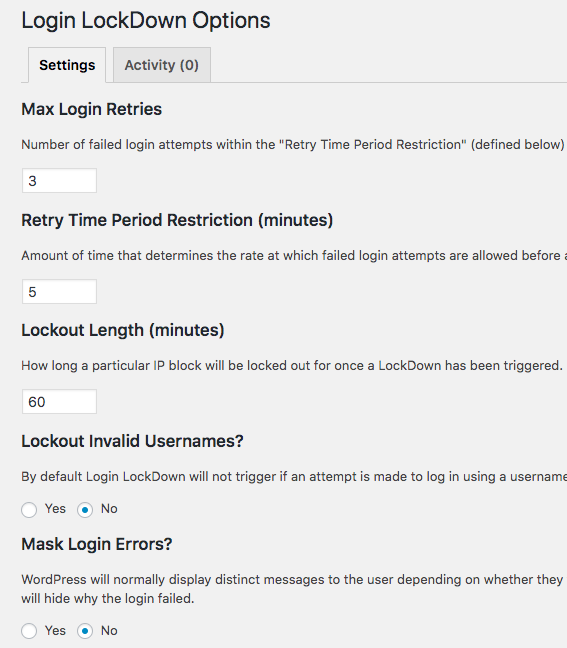
- Max Login Retries defines the number of unsuccessful login attempts within the “Retry Time Period Restriction” that an IP address will be blocked. It’s 3 times by default.
- Retry Time Period Restriction (minutes) identifies the period of time at which failed login attempts are allowed before a LockDown happens.
- Lockout Length (minutes) presents the period of time that the plugin will temporarily block users after their max login retries. The plugin locks an IP in 1 hour after 3 failed login attempts within 5 minutes by defaults.
- Lockout Invalid Usernames option disallows users from trying invalid usernames by default.
- Mask Login Errors feature lets users know why they can’t log in to the website. The reasons can be: they’ve entered an invalid username, or they’ve typed the right username but an incorrect password. You can disable this feature by toggling the option.
Remember to click Update Settings to save your changes.
#3 Insert a CAPTCHA to the WordPress Login page
Another way to effectively avoid brute force attacks comes to implementing a captcha on your WordPress login screen. Although it’s possible for you to manually adding a Captcha, installing a Captcha plugin is highly recommended/ should be taken into consideration. It also reduces the changes made on the theme’s functions.php file.
Among numerous captcha plugins available in WordPress repository, Advanced noCaptcha & Invisible Captcha proves effective to deny access to your admin area from bots and automatic scripts.
Similar to Login Lockdown plugin, Advanced noCaptcha & Invisible Captcha will be automatically added to the Settings section of WordPress sidebar after being installed.
You can select any versions of reCaptcha, including v2 I’m not a robot checkbox, v2 invisible or v3. On top of that, there are different forms on which you can display the captcha, for example, Registration form, Lost Password form, or WooCommerce Checkout form. Since we’re focusing on login pages, tick on the Login Form checkbox next to the Enabled Forms option.
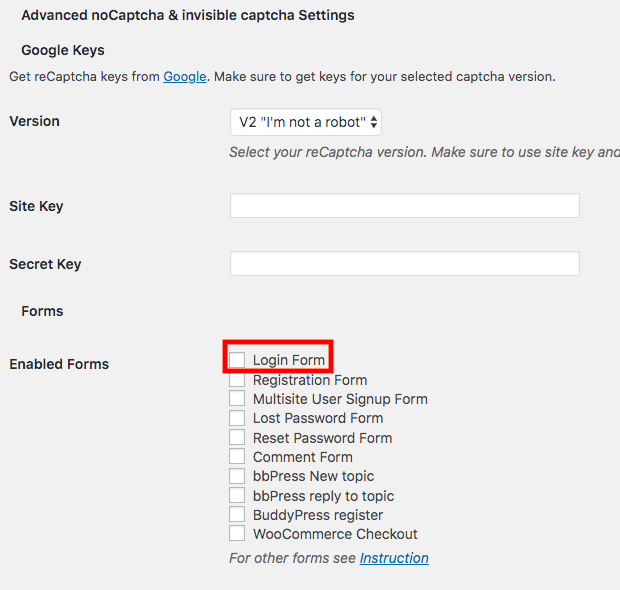
Click Save Changes to update your changes in the plugin Settings page.
#4 Install Updates of WordPress Versions, Plugins, and Themes
Older WordPress versions are opportunities for hackers to attack your site due to the remained and known security vulnerabilities.
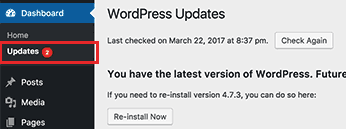
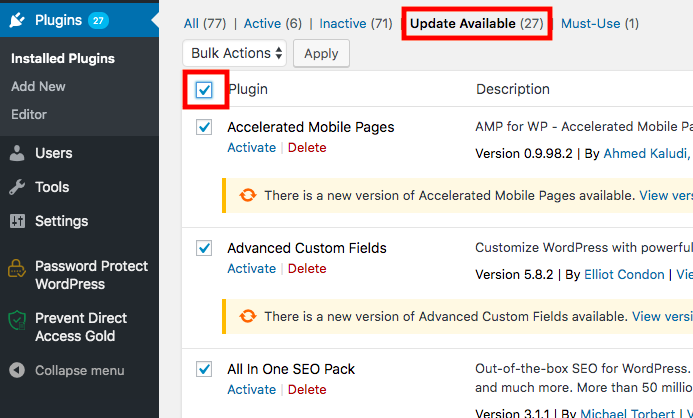
To update your WordPress website, head to Updates under your Dashboard. There are update notifications of WordPress core, plugins, and themes available on this page.
You can update the plugins by visiting the Plugins page.

Simply click on the update now link under each plugin to activate the latest version. In case there are so many plugin updates, go to the Update Available tab and tick in the Plugin checkbox to allow all the updates at the same time. Then, choose Update from the Bulk Actions dropdown.
It’s important to view the new version details before updating a plugin. Unless the latest version mentions security update, you should wait at least 1 week. This is the time when errors and bugs are reported and fixed.
#5 Add a Firewall Plugin
Every time attackers enter a password, it requires a load on your server. This process may slow down your website. Installing the Sucuri firewall would be a good solution to filter out bad traffic.
There are two main types of WordPress site firewalls you can choose from: Application Level firewall and DNS Level Website firewall.
- Application Level Firewall: This type of firewall plugin checks the traffic getting into your server before it loads the majority of WordPress scripts. Because it still affects your server load, this is not an ideal method to against brute force attack.
- DNS Level Website Firewall: This type of firewall works based on the cloud proxy servers of your site traffic. So just genuine traffic will be sent to your main hosting server which gives a boost to your WordPress speed.
Considered as the leading firewall plugin, Sucuri enables you to block attacks to your WordPress website by offering DNS level firewalls, intrusion, brute force prevention, and malware removal services.
The plugin will scan all the site traffic through their cloudproxy servers. While legitimate traffic is passed through, suspicious and malicious traffic will be blocked.
Please note that the firewall feature is available in the Sucuri Premium version only which requires you to subscribe to the Website Firewall service.
#6 Set up 2-factor Authentication
2-factor authentication (2FA) method allows you to add an additional security layer to your WordPress login page like a verification code or a one-time passcode. This passcode will be sent to the user’s phone via a text message.
Google Authenticator offers a complete solution to protect your site and content with 2FA and makes sure no unauthorized access to your site.
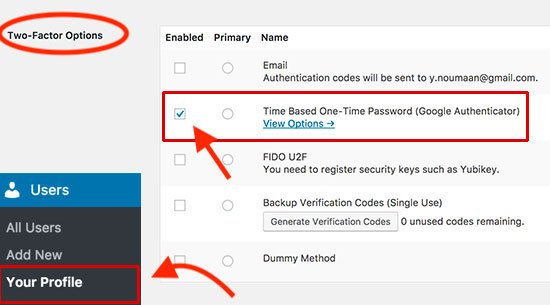
After activating 2FA, go to Users → Your Profile and find the two-factor options section. Enable the Time Based One-Time Password (Google Authenticator), then click on the View Option link to setup the authentication.
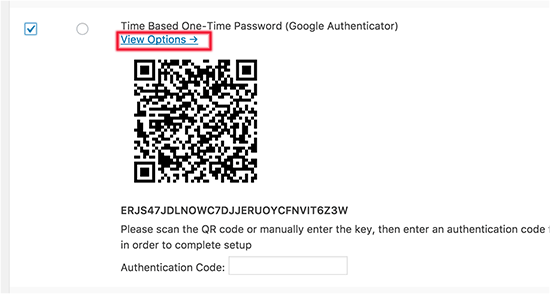
You will see a QR code now. Install Google Authenticator app on your phone and scan the QR code with your camera to use the 2FA option on the site.
Once you’ve finished verifying your account, hit the Update Profile button to save your changes.
From now on, when logging in to the WordPress dashboard, you have to enter the username and password in the login form first. Then, enter the verification code sent to your phone via an SMS message.
#7 Protect Your WordPress Admin Directory
You can password protect your WordPress admin directory to prevent unauthorized users from accessing your admin area. The following 5-step-guide shows you how to do that:
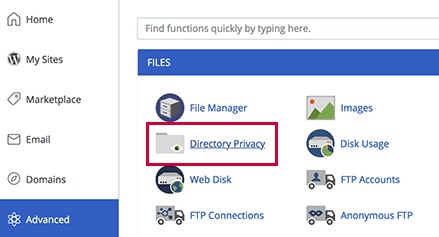
- Login to your cPanel dashboard
- Click Directory Privacy
- Choose the WP–admin file and select its name
- Create a user account with a username and a strong password
- Save your changes
Your WordPress site is secure with a password now. Only those with the correct login details are able to visit the site.
#8 Limit Access to wp-login.php by IP
In case there are only a few people who need access to your WordPress admin dashboard, you can block wp-login.php access to everyone but these specific users via a .htaccess or web.config file. This is also called IP whitelists.
To apply this method:
- Look for your IP address with the tool What Is My IP?
- Create a file in a plain text editor called .htaccess and add the following code:
# Block access to wp-login.php.
<Files wp-login.php>
order deny,allow
allow from 116.110.100.208
deny from all
</Files>
It’s possible for you to allow multiple IP addresses to access your WordPress admin dashboard by adding more “allow from” lines, for example:
# Block access to wp-login.php.
<Files wp-login.php>
order deny,allow
allow from 116.110.100.208
allow from 69.89.31.226
allow from 172.16.254.1
deny from all
</Files>
Remember to replace 116.110.100.208, 69.89.31.226, and 172.16.254.1 with the IP addresses that you intend to grant access to. Only those with the listed IPs are able to access your WordPress dashboard screen now.
Stop Suffering from Brute Force Attacks!
WordPress brute force attacks are unstoppable and can happen anytime on any websites. Instead of looking for a temporary solution to fix the consequences resulted from this dangerous security risk, think of an effective way to prevent it when you start building your site to save you time and effort.
Even if you’re a tech-savvy or just a layman, the methods above can help you stop brute force attacks on your WordPress site with ease.
Please leave a comment below if you have any questions on how to block brute force attacks from unauthorized individuals.
