An email list gives you a great opportunity to build a good relationship with your visitors, and so, increases the chance to convert them into your purchase customers. Whatever your business form is, never take it for granted!
The great thing is, you can easily create your own email list just with some clicks.
In this article, we’ll dive into how to do that with a form plugin and an email marketing provider.
You’ll also get informed about a powerful plugin – PPWP Pro – that allows you to send passwords to unlock protected content to your subscribers upon their subscriptions.
Let’s begin!
- What’s an Email List?
- Why Is Email Marketing Important to Sales?
- 3 Ways to Create an Email List in WordPress
- Basic Guide on How to Create an Email List for Your WordPress Site
- Send Password Protected Content to Your Subscribers
What’s an Email List?
An email list also called “the mailing list” or “subscriber’s list” is a collection of emails of users who subscribed to your email marketing channel.
Email lists play a key role in the success of your business. It can be used to send your user marketing materials and educate leads. You can update them with new features and inform ongoing discounts, etc.
Why Is Email Marketing Important to Sales?
Along with content and social marketing, email marketing proves one of the most vital marketing campaigns for every business. You can segment your site visitors, filter them in your sales funnel, and convert leads into customers over time. This doesn’t give visitors a feeling that you’re forcing them to buy your products.
Here are some common reasons explaining why you should use emails as your major marketing campaign.
Almost Everyone Uses Emails
A Hubspot survey states that 91% of consumers use email. Is this statistic convincing enough for you to start building an email list?
You can use emails to announce your discounts and new product launches. Since subscribers are already interested in your products/services, these programs engage them to take action more easily.
What’s more, they can share and forward those emails to anyone they’d like, and so, help your emails approach more and more users.
You Can Reach Customers in Real-time
Besides calling and texting, checking emails is one of the most popular uses for smartphones. According to Adestra, 61.9% of all emails were opened on a mobile device.
So besides focusing on marketing via social platforms, let’s also pay attention to connecting with your users by email.
Emails Help Increase Brand Awareness
Users subscribe to your email marketing channel hoping to get the latest news from yours. Apparently, they do have some interest in your business.
Sending emails consistently gives you a good chance to increase interest level and brand awareness. Since users see your emails weekly, it immediately reminds them of your business when having the demand.
Emails Allow Segmenting Your Audience
71% of consumers say a personalized experience would influence their decision to open and read marketing emails.
We bet so do you, right?
Mentioning your users’ names in emails is an old but gold method widely used by many marketers.
3 Ways to Create an Email List in WordPress
There are several ways to build an email list for your WordPress website. In this section, we’ll list out 3 most popular ways to do so.
#1 Add a Form in Your Sidebar
Sidebar appears as the first thing visitors see when landing on your site. That’s why it becomes a favorable place to put a sign-up form to attract subscribers. Your visitors can easily see and enter their emails when browsing your website.
It’s recommended to create a variety of adverts and signup forms too. Apart from the bottom of the homepage, the heading of your feature page is also worth your consideration to put a newsletter form.
#2 Make Slide-in or Popup Forms
You can develop interesting signup forms using pop-up tools to attract new leads. Once a user comes or is about to leave your site, the form will appear asking if they’re interested in receiving the updated content. You can introduce your sales and discounts via this popup as well.
Pop-up forms may be used with any blog posts, landing pages, or website pages.
#3 Add a Sign-up Form After Posts
The bottom of blog posts is another common place to put your sign-up form.
Whenever your visitor has gone through your content, they can subscribe to your mail list to receive more useful information.
But don’t just include an opt-in form at the footer of your posts. Sometimes you can also display the form within your blog posts. That way, you can get the most newsletter subscriptions from your website content.
Basic Guide on How to Create an Email List for Your WordPress Site
To start things off, choose a form plugin and an email service provider. In this article, we’ll use the free Contact Form 7 plugin and the ActiveCampaign email marketing platform.
Step 1: Create a Sign-up Form with Contact Form 7

Contact Form 7 turns out to be a popular and highly-rated WordPress contact form plugin available on the WordPress repository. It allows you to customize forms in any way you choose, display them on website pages, and manage multiple contact forms.
You can download, install and activate Contact Form 7 with ease from the WordPress plugin directory.
Once done, navigate to “Contact” > “Add New” in your WordPress dashboard to start setting up your form.
Under the “Form” tab, add the type of information you want to collect from your users, e.g. names, emails.
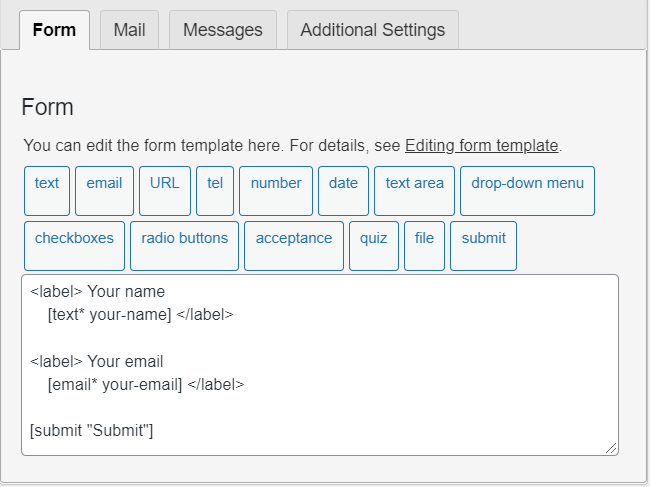
Don’t forget to press “Save” to apply all your settings. We recommend making your form as simple as possible. You should require users to enter emails only. Long forms with too much information required will discourage users from completing the submission process.
Now, feel free to embed your form anywhere on your site using the auto-generated shortcode.

Step 2: Connect Contact Form 7 with ActiveCampaign
Now, you need to connect Contact Form 7 with ActiveCampaign. Upon connection, users’ emails, which are collected via Contact Form 7, will be added to ActiveCampaign.
There are several plugins out there enabling you to handle this step without hassle such as Active Campaign & Contact Form 7 or MailOptin.
In this guide, we use the Active Campaign & Contact Form 7 plugin.
Upon activation, a new tab named “ActiveCampaign” will display in your Contact Form 7 configurations.
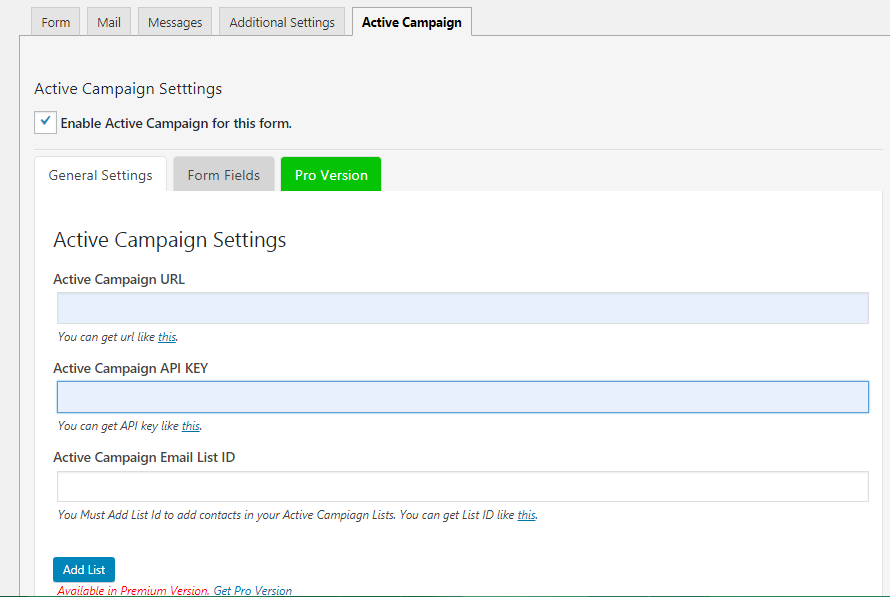
Here you can:
-
-
- Add your ActiveCampaign URL and API KEY
- Choose the List ID where you want to save your contacts
-
For more information on how to set it up, refer to the plugin documentation here.
You’ve successfully created an email list for your WordPress site.
Send Password Protected Content to Your Subscribers
There comes a time when you want to add an extra action after users subscribe to your email list. For example, you have private content that is available to subscribers only. The idea is, you’ll lock the content with passwords. Once your users submit the form, you can send them the passwords to access your private page.
How can you do that?
No worries. You have the PPWP Pro plugin and its ActiveCampaign Integration extension at hand.
These plugins will auto-generate a unique password for each new subscriber to access your password protected page once they sign up to your ActiveCampaign email list.
Let’s learn how to do it now!
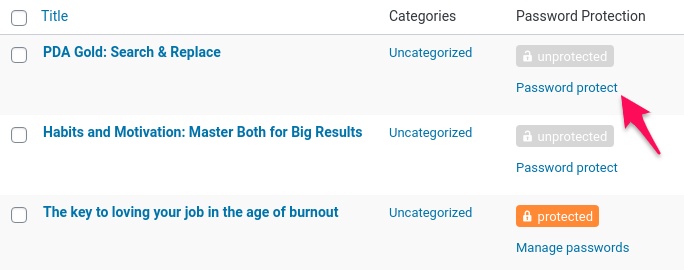
Step 1: Password Protect Content with PPWP Pro Plugin
After you download the PPWP Pro plugin and its ActiveCampaign Integration extension, go ahead and activate them on your site.
Once done, navigate to “Pages,” “Posts,” or any Custom Post Types sections to protect your desired content.
Step 2: Configure PPWP ActiveCampaign Integration
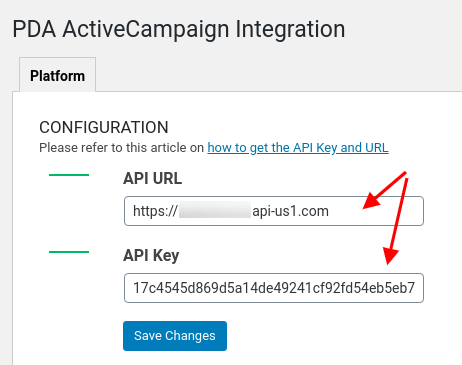
It’s time to connect ActiveCampaign with the PPWP Pro plugin.
To do that, simply insert the ActiveCampaign API URL and Key to PPWP ActiveCampaign settings page.
Step 3: Set Up ActiveCampaign Form
Now, let’s have the plugins auto-generate a password for each subscriber to access the password-protected page.
You can follow this detailed guide on how to associate the password protected page with an ActiveCampaign form.
Finalize this step and you’re done. Now let’s see how plugins work!
Create an Email List for Your WordPress Website Now!
We’ve walked you through the detailed guide on how to create an email list to drive more sales for your WordPress website. To start things off, you need to choose a form plugin and an email marketing provider first. In this article, we’ve opted for Contact Form 7 and ActiveCampaign, two big names in their respective fields.
You sometimes want to give your new subscribers a specific gift, e.g. access to private content.
To do that, simply integrate ActiveCampaign with the PPWP Pro plugin!
This plugin allows you to password protect your content. It integrates well with ActiveCampaign to automatically send passwords upon form submissions.
What are you waiting for?
Let’s go ahead and create your own email list now!
