If you are running a membership website or blog site, you may need a login page. A WordPress login page makes users sign up and log in using their credentials. It allows them to visit, share and contribute to your website with the help of posts, videos, or comments. By default, WordPress provides a generic and boring client login page.
It doesn’t have any sort of built-in options to add your logo and change your page’s feel to match your WordPress theme. It is far behind to be an ideal client login page.
So, a custom WordPress client login page builder will play an important role here. It helps to add your branding to the website. You can add several fields to get more data from the visitors.
Above all, it also facilitates you to limit the WordPress admin panel access by specifying user roles. In short, a WordPress custom client login page builder offers many benefits with a pleasing user experience.
- Why Create a Custom Client Login Page?
- Different Methods to Create a WordPress Custom Client Login Page
- Create a WordPress Client Login Page using Theme My Login
- Create a Custom WordPress Client Login Page Using WPForms
- Customize Your WordPress Site Login Form Page Design
- Change the WordPress Login Logo & URL
Why Create a Custom Client Login Page?
Suppose you’re running a community-powered site like a forum, membership website, niche social network, or any other site that requires users to register an account and then log in. In that case, you’ll need to create a custom login page.
The default WordPress login page you see looks generic and boring. With a custom client login page, you can personalize all the elements on the page around the form.
If you have a custom client login page, you can hide the default login page. It can reduce login spam and keep your WordPress site secure.
Different Methods to Create a Custom WordPress Client Login Page
It is always an excellent idea to create a custom login page rather than using a boring WordPress login page.
At the most, you can add your logo & white-label to the admin panel. But what about the WordPress admin panel access? So, if you don’t want to allow each logged-in user to access the WordPress admin panel, create a custom client login page.
However, there are two basic ways to create your custom login page. They are:
- Create a WordPress login page using Theme My Login
- Create WordPress login page using WPForms
Create a WordPress Client Login Page with Theme My Login
You have to install & activate the Theme My Login plugin.
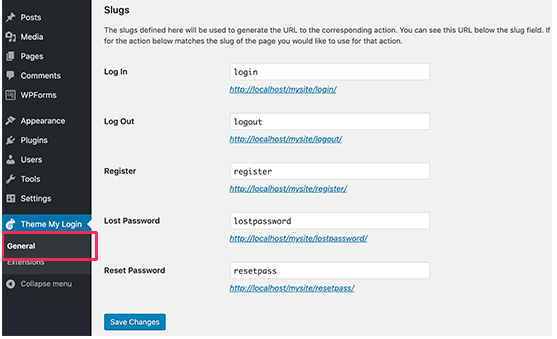
After activation, Theme My Login automatically creates links for your custom WordPress login, logout, registration, forgot password, and reset password actions.
You can also customize these WordPress login URLs by going to Theme My Login > General page. Scroll down to the ‘Slugs’ section to add or modify these links used by the plugin for login actions.
Theme My Login also helps you to use the amazing shortcodes to create custom login & registration pages. You can create a page for each action & then insert the page slug so that the plugin can find & redirect users properly.
Let’s start with the login page.
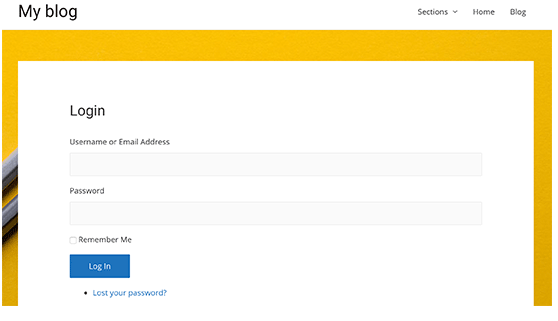
Go to “Page > Add New” to add a new WordPress page. You need to give your WordPress page a new title & then enter the following shortcode “[theme-my-login]” inside the content area.
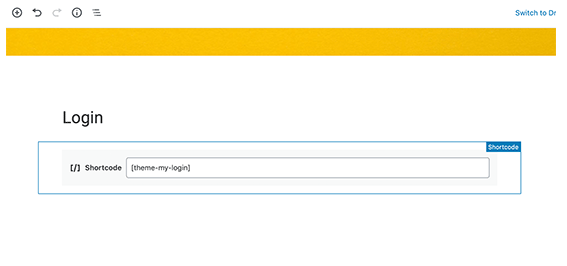
You can now publish your page & preview it to see your custom client login page in action.
Repeat the process several times to create other pages with the following shortcodes.
[theme-my-login action=”register”] for registration form.
[theme-my-login action=” reset pass”] you can use this shortcode on the reset password page.
[theme-my-login action=”lostpassword”] for the lost WordPress password page.
Create a Custom WordPress Client Login Page Using WPForms
The WPForms is one of the best online WordPress form builder plugins on the market. It allows you to create custom login & registration forms for your website easily.
WPForms is a premium WordPress plugin, & you will need at least their Pro plan to access the user registration add-on.
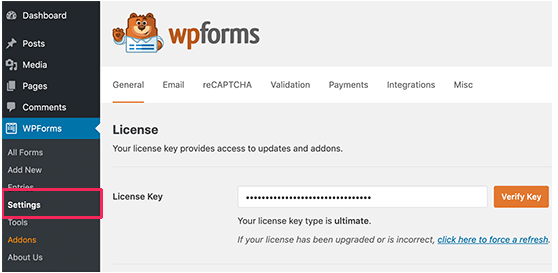
The first & foremost thing you need to do is install & activate the WPForms plugin.
After activation, you need to go to the “WPForms > Settings page” to enter your license key. You can also find this data under your account on the WPForms website.
After entering the license key area, you would be able to install add-ons. Go ahead & visit WPForms > Add-ons page & locate the User Registration Add-on.
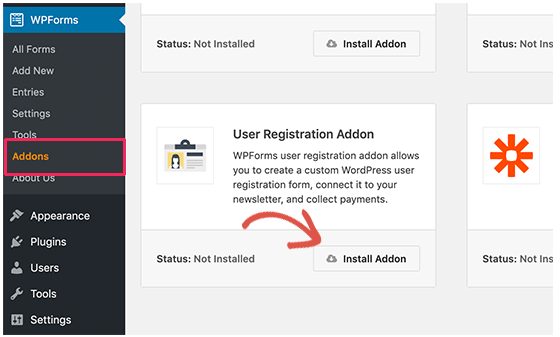
Next step is to click on the Install Addon button to download & activate the add-on. You are now ready to add your WordPress custom login forms.
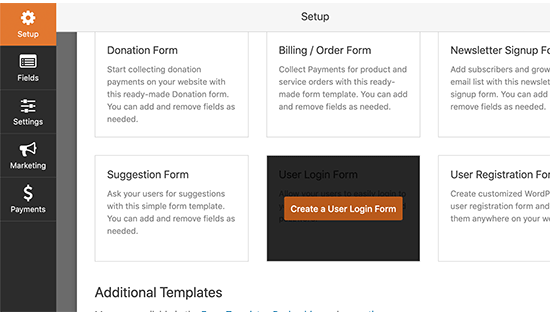
Go to “WPForms > Add New page” area & then scroll down to ‘WordPress User Login Form’ template area. You need to tap on the ‘Create a User Login Form’ button to proceed further.
WPForms will then load the User Login Form with the required fields. You can click on the fields option to add your description or text around the fields.
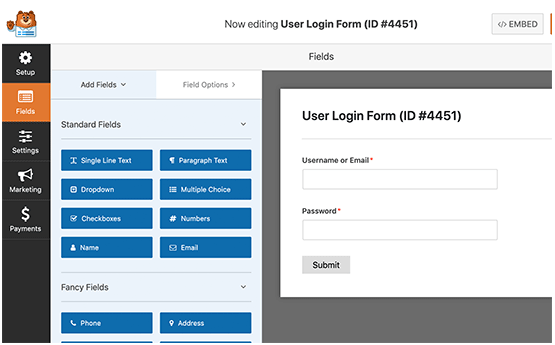
You can also change other user settings. For example, it automatically includes ‘Submit’ as the button title. You just need to click on it & then change it to “Login” instead.

You can also make decisions based on what happens once a user is successfully logged in. Go to the “Settings > Confirmation” area & choose an action to perform.
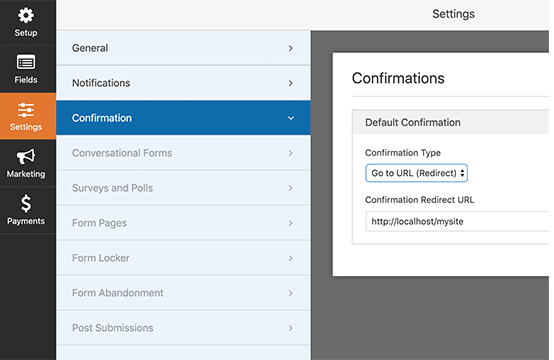
You can redirect any visitor to any other page URL, redirect them to the homepage, or show them a simple message that they are now logged in.
Once you are satisfied with the WordPress form settings, you need to tap on the “Save button,” which you will see on the screen’s top-right side & close the form builder.
Customize Your WordPress Site Login Form Page Design
Your custom client WordPress login form page will use your theme’s page template & styles by default. It will have your theme’s header, footer, & sidebar widgets.
And, if you want to completely take over the entire WordPress page & design something from scratch, you can use any WordPress page builder plugin for creating pages.
With the help of the page builder plugin, you can create a custom page layout & then add a login form widget given by Theme My Login or WPForms.
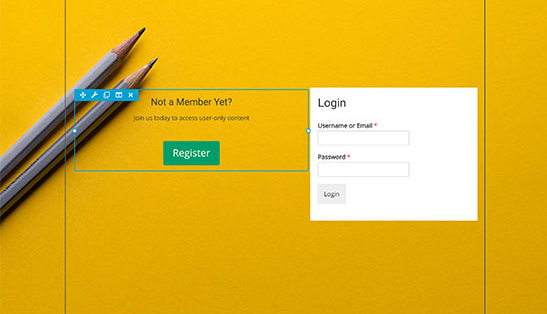
Here we have used the popular Beaver Builder plugin, but you can also use Elementor or Divi builder. We also used a background image on a fullscreen page layout & then added two columns. In one column, we added some text & a button. In the other column, we have added the WPForms widget.
The main benefit of Beaver Builder is that it’s a 100% drag & drop solution.
Note: Since you are already logged in on the WordPress site, both Theme My Login & WPForms plugins may not give you a live preview of the admin login form. WPForms plugin has an amazing option where you can turn this off in the form settings.
If WordPress website builder plugins are not your thing, you can use custom CSS to style the form & the login page itself. Alternatively, you can also use the CSS Hero plugin to add custom CSS styles easily.
Change the WordPress Login Logo & URL
You don’t always need to make a completely custom client WordPress login page for your website. A lot of websites replace or change the WordPress logo and logo URL while still using the default client login page.
If you want to replace the WordPress site logo on the login screen with your logo, you can easily do so using WordPress plugins or adding custom code.
Conclusion
A custom login page plays a significant role in social media engagement & email marketing. It should be like a part of the website layout. Putting efforts to customize your website’s WordPress client login page is proportional to creating your online brand. It will give a personalized and splendid online experience to the visitors. So, paying attention to the custom client login page may result in increased traffic.
We hope this post helped you learn different ways to create a WordPress login page for your website.
If you have any sort of questions about the custom client login page in WordPress, you can ask us in the comment section.
