WordPress platform comes with a user role management system which tells you what a certain user can and cannot do on your site. Understanding WordPress user roles and permission is crucial to manage any WordPress website.
For instance, if you are creating a site for a customer, you wouldn’t want them to change the installed WordPress theme. Similarly, it is unwise to let bloggers of a multi-author blog install or remove any plugins. So, it’s important to add user permission to your WordPress site in order to manage your website more effectively.
- How to Manage WordPress User Roles Effectively
- Customize Existing User Roles
- Customize User Roles Using User Role Editor
How to Manage WordPress User Roles Effectively
Knowing all WordPress user roles and capabilities is extremely important, but you also need to understand how to manage roles conveniently on your websites. While no two websites are exactly the same, there are some basic rules you can follow to make the best possible use of WordPress user roles & capabilities.
Give Minimal Access to Every User
Assign each user on your website only the level of access they need. It is always better to give less permission than too much. Protecting WordPress user roles is crucial to keep your website and its content secure.
Limit the Number of Administrators and Editors
As a general rule, every WordPress website should have just one Admin, and Admin should only make major changes to the website. WordPress suggests that you adhere to the “principle of least user privileges,” which means that you should only give a user the privileges important to perform their desired work.
For instance, it is good to use an Editor level user to control content on the website, rather than an Administrator role. If there’re more than one Editor on your website, ensure that you can trust them with their extensive web capabilities.
Assign the Author role to all the content creators who you can trust, as they can actually publish and delete their own blog posts. Contributor WordPress roles are a better fit for the new content creators & guest posts.
Customize User Roles Depending on the Need
The default WordPress roles are quite useful, but they may not fit every use case. For instance, granting Authors the capability to moderate comments.
Thankfully, WordPress provides us the capability to customize any user roles or create new user roles depending on our unique needs. You can customize manually through code or with the help of user role plugins.
Customize Existing User Roles
Default user roles are designed to have such capabilities that meet the needs of most WordPress sites. For example, if you run a magazine website, you can give the Editor role to your senior staff and the Author user role to your junior staff. You can assign a Contributor role to your guest authors and the Subscriber user role to your website visitors.
But what if you wanted to customize or modify the permission and capabilities of an existing WordPress user role?
One thing which is disliked about the author user role is that not only can they publish their own blog posts, but they can also delete the post after it is published. This can easily undermine your complete editorial workflow. It can also be dangerous if a paid author leaves your company on bad terms and decides to delete all the blog posts they wrote (the ones you paid them for).
Let’s say that you want to customize the author user role, so that your authors cannot delete their posts or articles once they’re published.
First thing you have to do is install & activate the WordPress Capability Manager Enhanced plugin. Upon activation, go to Users > Capabilities to modify or customize user roles.
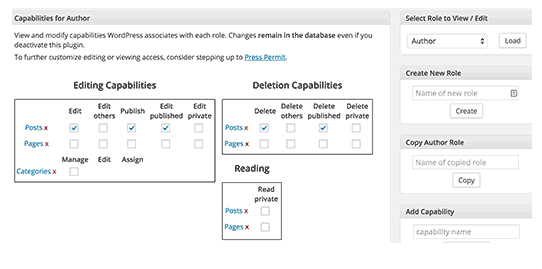
Next, choose the WordPress user role you want to modify from the top box in the rightmost column and then click on the load button. This will load your users capabilities in all the boxes on the left side.
All you have to do is uncheck the capabilities that you need to remove from that specific user role. For example, in this scenario we need to remove the capability to delete published articles and posts from Authors. Hence, we’ll uncheck “Delete Published” capability. Once you’re done, go to the bottom of the page & click on the save changes button to store your user settings.
Customize User Roles Using User Role Editor
User Role Editor is a well-known roles and capability management WordPress plugin in the WordPress repository. It comes with a simple user interface that helps anyone to edit user roles and capabilities with a single click.
After installing and activating the user role editor plugin, you can then go to Users > User Role Editor in the admin dashboard to access its primary interface.
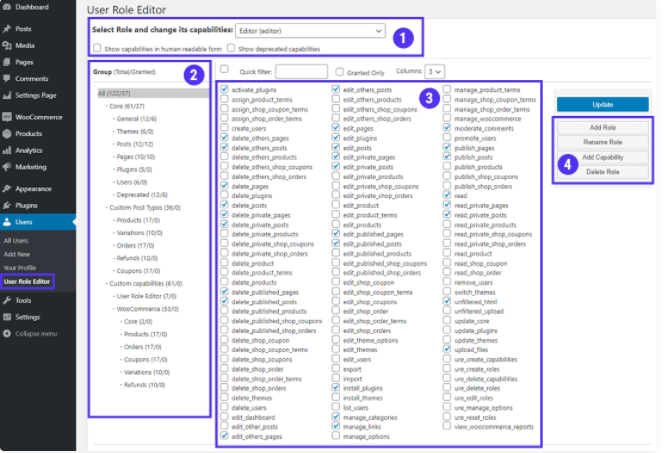
Here is a complete overview of the dashboard sections marked above:
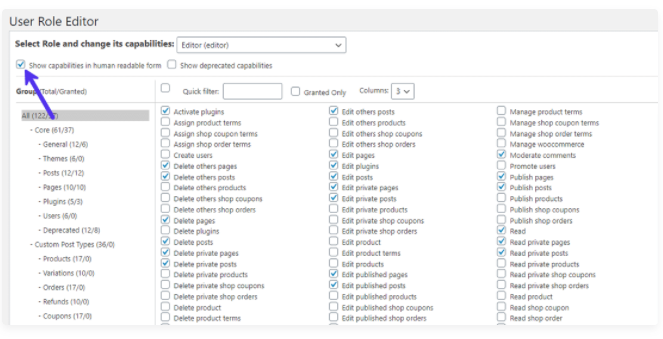
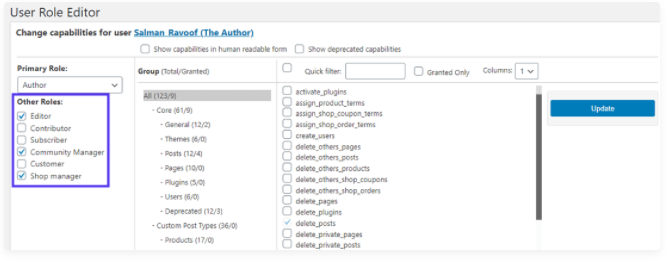
- Choose the role you want to modify from the given dropdown menu. It will list not only the default user roles but all the user roles present in the database. You can also show the capabilities in the human-readable form rather than the constants. Another option enables you to see deprecated capabilities that are no longer supported in the newest version of WordPress.
- User Role Editor groups all sorts of capabilities into particular categories on the left. The main category has all the built-in capabilities.
- On the right side, you will find all the capabilities listed. As in the image ‘All group’ is selected, you can see all the capabilities. However, you can also filter it down by clicking a group on the left side. You can tick the ‘Granted Only’ option on the top side to hide all capabilities that are not used by any WordPress user role.
- You can also add, rename, assign capabilities, and delete any role from here. At the bottom, you will find an additional option to hide the admin bar for the user role.
To customize any WordPress user role, you need to tick or untick the capabilities you want & click the Update button to save the changes. It’s extremely easy.
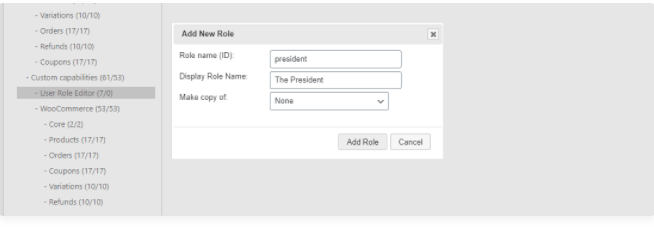
Click the Add Role button to create a new user role. You can make a user role from scratch or duplicate an existing user role by using the ‘Make Copy’ of the dropdown option.
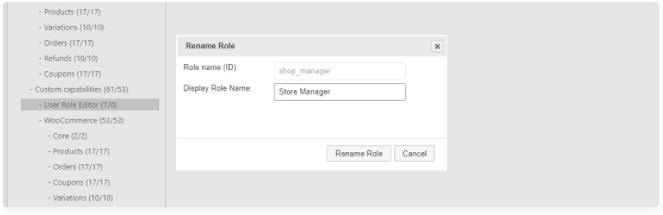
You can also choose to rename the ‘Role Display Name’ by simply clicking the ‘Rename Role’ button. However, you cannot change the role ID (or the Role Name).
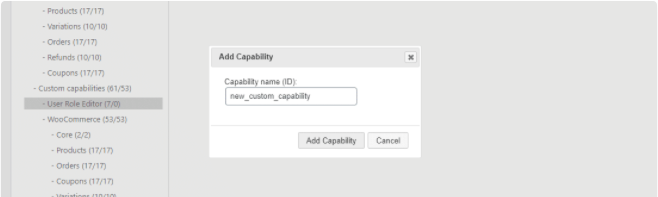
You can add new capabilities by simply clicking the ‘Add Capability’ button.
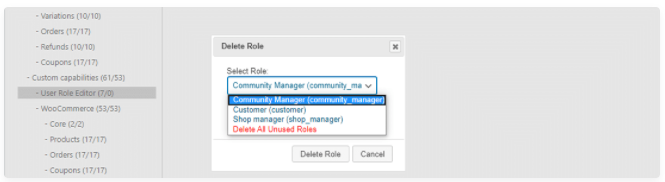
Clicking the Delete Role button to delete custom user roles that you have not assigned to any user.
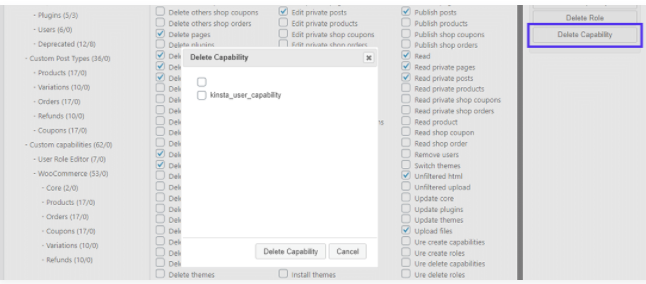
You should note that the ‘Delete Capability’ button appears only if a capability is unassigned to non-admins. It is simply hidden otherwise.
You can assign multiple user roles to the same user or you can assign them no role at all.
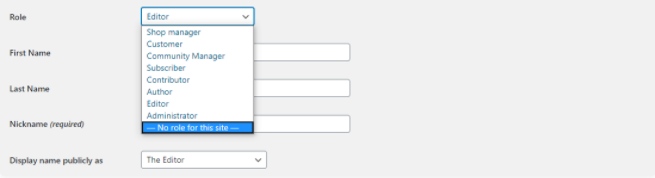
To assign a user multiple roles, you have to go to the users panel in the dashboard, then click the capabilities link you will see below after hovering over the username.
If you go to Settings > User Role Editor in your administrator dashboard, you will also find other options for User Role Editor plugin.
Here, you can change or customize the default settings of the plugin, install additional modules, or change the default role assigned to new WordPress users, and even reset user roles & capabilities to their default state.
Final Thoughts
WordPress roles & capabilities are fundamental reasons behind user access management. They help you manage what actions all users on your website can perform. They are also used together with many WordPress plugins and themes to add highly useful features and functionalities to the core WordPress.
WordPress comes with its own set of user roles and capabilities, but if you want more flexibility, you can easily customize them or create your own user roles & capabilities. You can do this with your own piece of code or use a third-party WordPress plugin.
Understanding what user roles and capabilities are and learning how to control them, are a critical step towards mastering the WordPress platform.
