About half (43.2%) of all websites on the Internet use WordPress as their content management system (CMS).
It’s not surprising, considering how easy it is to create and manage websites using WordPress. Even people who don’t know much about web design can jump in and use WordPress in a few minutes.
When you integrate WordPress into your website, you will have access to a special admin area. Here, you can add new content, track the site’s performance, and adjust its settings, among other things.
Let’s say you share your site with other people (partners, freelance content creators, etc). It’s important to control who gets to see and use what function in this admin area. Not just to prevent clutter but also to improve the site’s security.
This guide will show you how to hide menu items for specific users in WordPress.
- Reasons to Hide Menu Items for Specific Users WordPress
- User Roles & How They Help You Hide Menu Items
- How to Hide Menu Items for Specific Users WordPress
Reasons to Hide Menu Items for Specific Users WordPress
When someone enters the admin area of your website, they have to log in through a special portal. In the default WordPress setting, a user can access every tool and function available in the admin area.
In other words, if you give someone access, they can change everything about your website without asking you.

That can be a problem in case you’re running a multi-author website or have clients visiting the admin area.
Most users, unless they are web admins, don’t need full access to every tool in the admin area. When they use a tool they shouldn’t be using or change a setting they shouldn’t change, your website can be seriously damaged.
Additionally, too many unnecessary menu items and tools on people’s screens can clutter up their workspaces. This makes it difficult for them to navigate the admin area.
That’s where the ability to hide admin menu items WordPress from some users comes in handy. You can prevent people from accessing things they shouldn’t be seeing or using. Or you can hide unnecessary items on the screen to make everyone’s workspaces in the admin area cleaner.
User Roles & How They Help You Hide Menu Items
User roles determine how much control power someone gets on the website.
For example, the website owner can have ultimate control over everything, including the most critical settings. Conversely, someone with a guest user role can only see a small selection of menus and use a few functions in the admin area.
If you run a multi-author website, setting up user roles is critical. If you don’t, everyone will automatically be considered as the admin. Anyone logging into the admin area can add, change, and use anything they want.
By adding user roles, you can give the desired people credentials to access to your website’s admin area. You can use each person’s credentials to restrict what they see and use in the admin area.
Here are some ways for you to do that!
How to Hide Menu Items for Specific Users WordPress
There are two main ways to do this, each one with its pros and cons.
#1 Use Plugin
For beginners and general WordPress users who don’t have experience with coding, we highly recommend using plugins.
They work just as well as coding while being far easier to use. Most plugins only need you to install them through the Plugins menu. Follow the instructions on-screen, and voilà, you would have the result you want.
The same thing applies to hiding menu items for specific users in WordPress.
Members is a great, free plugin that helps you deal with this problem. It’s a membership management system. You can create new user roles and edit what they can and can’t do in the admin area.

Plugin Instructions
After you install the plugin, its working menu will appear in the main menu bar of your admin area.
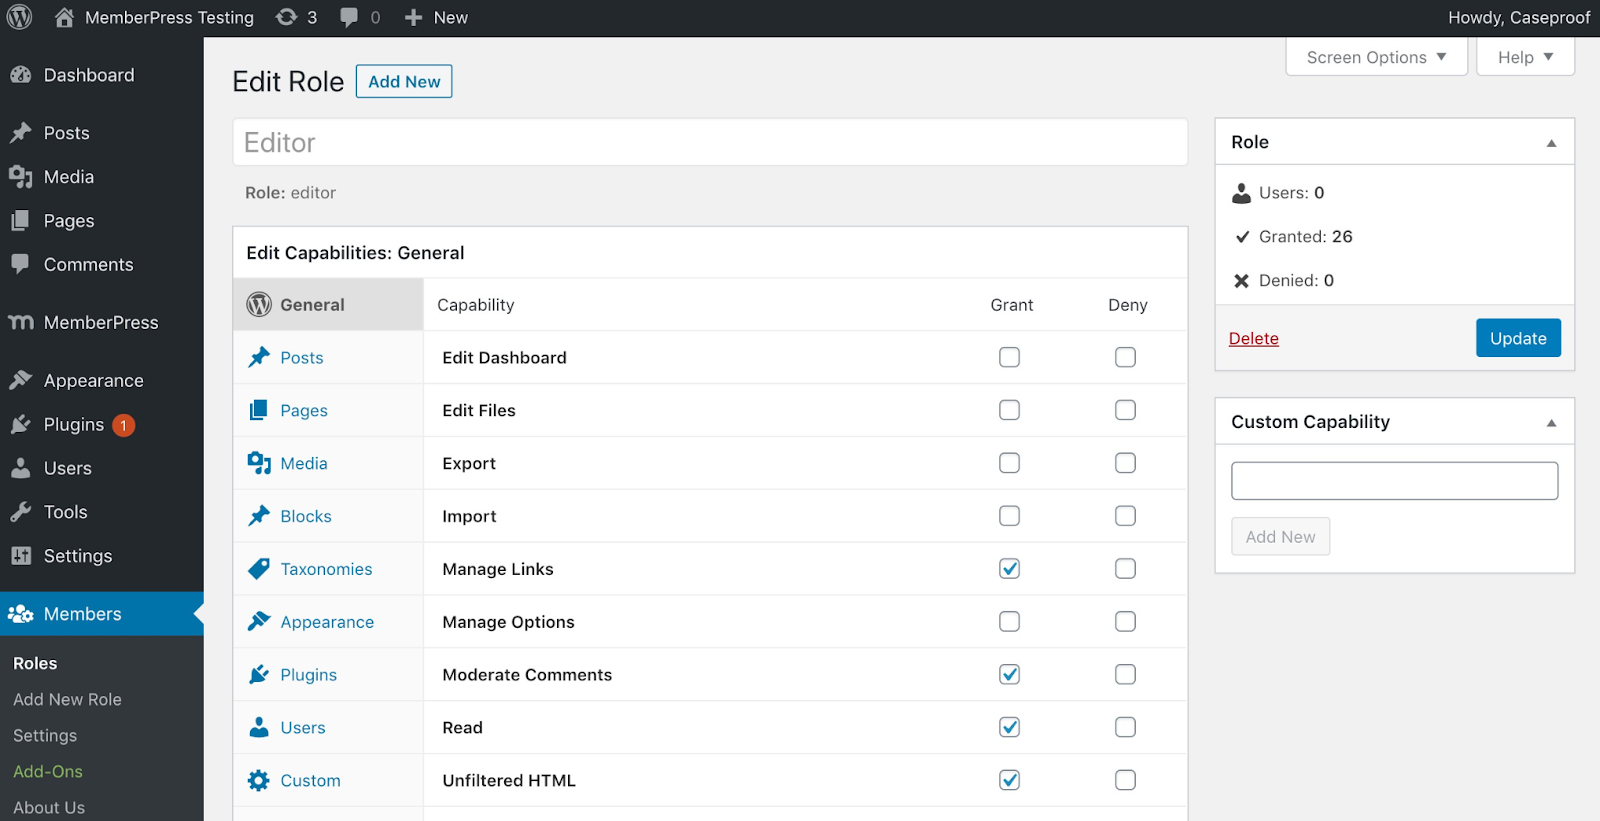
- Click on the Members tab and go to the Roles sub-tab. The plugin will display a full list of all user roles on your website. You can add new user roles through the Add New function at the top of the list.
- Click on the small Edit button at the bottom of the desired role to open the User Role Editor. In this Editor, you’ll be able to see all of the powers you can grant or deny to users.
For example, to create an Author role, press Grant on the settings. Then give them the ability to add and edit new posts on your website.
Let’s say you don’t want them to have the ability to delete other people’s posts. You can search for that power in the Editor and press Deny on this ability.

3. Click Apply.
Now, anyone listed as an Author can add and edit new articles but can’t delete other people’s works.
Plugins like Members are very easy and intuitive to use. That is why we highly recommend this approach to most people.
#2 Remove Admin Menu Using Code
For those who wish to manually change the theme’s coding to modify the user’s menu, this section is for you!
Before diving in, you have two choices:
- Add a code snippet to the child’s function of your core functions.php file.
- Use a plugin called Code Snippets to insert the code into your system.
We highly recommend taking the latter route. That way, even though you decide to change your site’s theme, you will keep all of your settings.
A second caveat is that this method only prevents people from seeing the menu items in their admin area.
In other words, we’ll only show you how to hide menu items WordPress. People can still access these tools if they have direct links to them. You’ll need other guides if you want to block people from accessing or using parts of the web admin.
Clone a WordPress Administrator User Role
The first step is to create a new user role. An easy way to do that is cloning the default Administrator user role. The new, duplicated user role will have all of the admin powers, which we’ll change later. We’ll call this clone “Site Author”.
Open Code Snippets and copy-and-paste this code into the box.
function cloneRole() {
$adm = get_role('administrator');
$adm_cap= array_keys( $adm->capabilities );
add_role('site_author', 'Site author’);
$new_role = get_role('site_author');
foreach ( $adm_cap as $cap ) {
$new_role->add_cap( $cap );
}
}
Remove Specific WordPress Admin Menu Item for User
Once you’ve cloned a new user role under the name “Site Author”, pay attention to the slug, called “site_author”. You can use the slug to call on the specific user in the code.
Now, let’s say you want to remove the Site Admin menu item from users listed as “Site Author”. Copy and paste this code into Code Snippets:
function hide_siteadmin() {

  if (current_user_can('site_author)) {

     /* DASHBOARD */
      remove_submenu_page( 'index.php', 'update-core.php');  // Update
  }
}
add_action('admin_head', 'hide_siteadmin');
Once you apply this code, the “Update” menu item for the users listed as “Site Author” will be removed.
You can modify this code snippet to remove other functions and hide the menu item in WordPress.
Hide Menu Items for Specific Users WordPress Like a Pro!
Knowing how to hide menu items for specific users in WordPress is a handy skill if you run a multi-author website. It’ll keep your website safe from accidents and malicious actors.
Besides hiding the menu items, you can also hide your WordPress content against specific user roles. Check out our guide now!
No matter which method you choose above, we wish you success. If you run into any trouble or have any questions, leave a comment in the comment section below. We’ll get back to you as soon as possible!
