WordPress’s default post types help you create blog posts, pages, or attachment pages easily. Most of these posts and pages follow similar formats. When creating efficient content for your site, you might find the default post types restrictive. That’s where custom post types come into play.
Custom post types are content types like posts and pages generated to better suit your demand. Since they’re custom, you can call them whatever you want or add any unique design. For more specific usages, some custom post type’s layouts can differ from others. So you need to provide various templates for each custom post type, depending on your purposes.
In this post, let’s define what templates in WordPress are and how to create a custom post type template.
What Are Custom Post Type Templates?
Custom post type templates, basically a PHP file, define how your WordPress custom posts look. WordPress offers different default custom post type templates, including:
- Single-{post-type}.php – Whenever a user requests a single post from custom post type, WordPress uses the single-{post-type}.php template. For example, single posts from shose_product custom post type will apply the single-shoes_product.php template.
- Archive-{post-type}.php – WordPress uses the archive template to display the custom post type archive page by default.
- Search.php – When a visitor searches for a custom post type in your site, WordPress will use the search.php template to display search results.
- Index.php – Once the 3 templates above are not shown up, the index.php file will be used for the custom post type.
Custom post type templates allow you to apply new layouts to your custom posts. WordPress will use the default files such as single.php, archive.php, and index.php files for your custom post types unless you create your own custom post type templates.
When Do You Need Custom Post Type Templates?
You can make multiple custom posts at the same time with a custom post type template. The following cases indicate when you should consider creating a custom post type template:
1. Coupon custom post
More than 90% of customers use coupons to make purchases. Offering discounts to your customers through blogs helps increase sales. The blog-style coupon is a custom post since it doesn’t look like any content-focused default post types. Instead, it will mainly include a short introduction of your product, and a coupon code for customers to click on and get the discount.
2. WordPress glossary
Your product involves a bunch of jargon that not all visitors or even potential customers can understand. If you don’t explain these specialized terms clearly, customers won’t make purchases. They’re not sure if your product can solve their problems. That’s where glossaries come in handy to effectively help visitors get to know your products and services.
In fact, glossaries couldn’t be created by any default post types. You need to use custom post types. Let’s take Prevent Direct Access as an example. The plugin helps protect WordPress media files for photographers, course owners, etc. Its features include a lot of technical terms such as Original links, Protected links, and more. Those who haven’t used it or referenced these terms’ definitions before will have no idea of what the plugin does. That’s why a custom post type template is created to make glossaries to support users.
3. Additional fields
You want to enter more information into your content, for example providing custom meta boxes in multiple blogs. Instead of adding these custom fields to post by post which takes a lot of time, you can properly create a new custom post type template. Any custom posts applying this template will include your desired additional fields.
How to Create a Custom Post Type Template in WordPress
There are 2 ways to create templates for custom post types. You can either edit the single.php file or use Templatic plugin.
Before diving into the 2 mentioned solutions, let’s create a child theme first. This child theme allows you to modify and save edits separately without affecting the parent theme. What’s more, you won’t lose your changes once the parent theme is updated.
We will use Twenty Nineteen, WordPress’s latest default theme to show you how to create custom post type templates. If you are using this theme, you can get started right away. In case your WordPress site still applies the previous versions, please update to this version to have full capabilities.
5 steps below show you how to generate a child theme:
- Go to your theme directory
- Create a new folder
- Provide a name for the theme.
- Add 2 new files style.css and functions.php
- Use the code below to set up these files
*/

Theme Name: Custom Post Type Template Example

Theme URI: http://passwordprotectwp.com

Description: An example theme utilizing custom post type templates

Author: Password Protect WordPress Team

Author URI: http://passwordprotectwp.com

Template: twentynineteen

Version: 1.4

*/

<?php

add_action( 'wp_enqueue_scripts', 'cptt_assets' );

function cptt_assets() {

wp_enqueue_style( 'parent-style', get_template_directory_uri() . '/style.css' );

wp_enqueue_style( 'child-style', get_stylesheet_directory_uri() . '/style.css', array( 'parent-style' ));

}
Once done, the new child theme will be shown in the Appearance section of your WordPress admin.
After generating the child theme, let’s create a custom post template.
#1 Edit single.php Files
You don’t want to insert any plugins to your WordPress site or you’ve installed many and don’t want to add any more? Then, this method is for you. Follow this 5-step-guide to easily create a custom post type template:
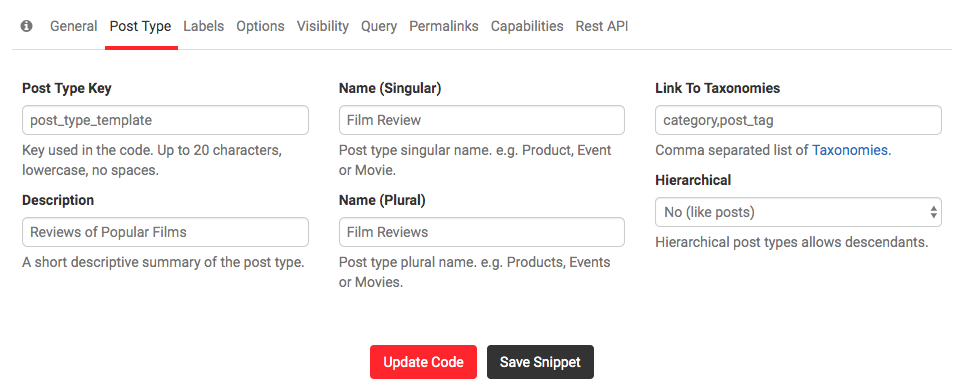
- Go to GenerateWP
- Provide your custom post type name in the Name (Singular) and Name (Plural) boxes
- Enter a descriptive summary of the post type in the Description box
- Hit Update Code
- Copy the generated code and paste in your singple.php file

#2 Create Custom Post Templates by Templatic plugin
Templatic allows you to create and choose post templates from a simple dropdown in almost the same way as adding page templates. Inserting a plugin seems more preferable than editing single.php files manually since you can avoid the complexity of code generation.
There are 2 main steps to create custom post type templates with Templatic plugin:
Step 1: Install the plugin
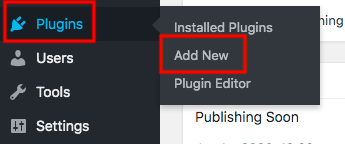
- Go to Plugin → Add New in your WordPress dashboard

- Search for Custom Post Templates by Templatic
- Click Install Now then Active the plugin

Step 2: Create custom post type templates
- Either duplicate your default single post template (single.php file) or create a new template file
- Add this code to the top of the new child file you’ve created
<?php

/*

PostType Page Template: [Descriptive Template Name]

Description: This part is optional

*/

?>
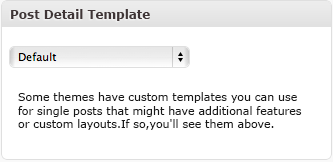
After creating the new custom post type template, you can click on the Post Detail Template dropdown in every post’s editing screen to select a template. If you forget to assign a template for the post, the default template will be used.

You’re probably wondering if the plugin can help design specific product pages for your WooCommerce store. Yes, it works well with WooCommerce. You’re able to create any custom templates and allocate them to any of your product pages.
Let’s Create Custom Post Type Templates for Your WordPress Site
Custom post type templates prove useful in many cases. You can apply a new layout for your posts beside WordPress default templates like single-{post-type}.php or archive-{post-type}.php.
There are 2 main ways to create custom post type templates, either editing the single.php file manually or installing a plugin. Before creating a custom post type template, remember to generate a child theme and make changes there instead of editing your parent theme directly so that you can reduce the risk of losing data.
If you have any concerns about creating or protecting custom post type templates in your WordPress sites, let us know in the comments section below!
