Before going live with your site or making a visual presence, you should learn the basics and test the output of the developed solution. A localhost site lets you check and experience the updates, changes, and settings etc. to be sure about the final outputs. Setting up a single site in localhost seems to be a piece of cake. How about doing the same thing with a WordPress multisite?
If you’re finding instructions to set up a WordPress multisite network in your local host, you’ve come to the right place. This article will give you a detailed guide on how to achieve your goals.
What’s WordPress Multisite Network
A multisite refers to a network of two or more sites that operate off a single WordPress install. In other words, it empowers you to run a network of sites under a single WordPress dashboard.
You can manage everything including the number of sites, features, themes, and user roles at one place without having to set up single sites separately.
However, the WordPress multisite doesn’t serve everyone.
Multisite configuration can be extremely helpful in certain cases, but in others it can lead to an administrative catastrophe.
It’s important to understand what Multisite is and what problems it was designed to address before you decide to use it.
Let’s see if you really need a multisite installed in the section below.
When to Use WP Multisite
A multisite network is your lifesaver if you’re creating a network of sites sharing similar functionality. This can be added through plugins, custom applications, or specific server configurations.
WordPress.com is, by far, the largest example of a multisite network.
Universities are a great example. A lot of them use multisite to provide their staff with a way of posting internal blogs.
Real estate companies also make use of WordPress multisite to provide their real estate agents with a basic website.
The designs of these sites are the same, only the content is different from realtor to realtor.
When Not to Use WP Multisite
If you’re in one of the following scenarios, let’s get the idea of using WordPress multisite out of your head.
- You’re managing a few websites with different functions, purposes, and goals.
- You need totally separated databases. Remember, Multisite stores everything in the same database.
- You need to share content or want a cross-site search tool. WordPress Multisite does not provide you the solution. Networked sites are content independent.
Moreover, plugins, themes, widgets may not work on WordPress Multisite as they are usually created for a regular WordPress. This is a point that you should consider.
How to Setup WordPress Multisite on Localhost
Before getting started, we assume you’ve already installed WordPress on your computer. If you haven’t yet, simply follow the instructions below.
This is the time to decide whether to install additional sites in a subdirectory or under a sub-domain. Please notice that you cannot change this later.
In fact, WordPress subdomains and subdirectories relate to the structure of the URLs used for each of the sites in your Multisite network. They don’t correspond to where your server stores the sites, but to the way WordPress creates URLs for them.
-
- A sub-domain URL for individual sites will read: site1.YOURSITE.com, site2.YOURSITE.com
- A sub-directory URL for the individual sites will read: YOURSITE.com/site1, YOURSITE.com/site2
Currently, WordPress doesn’t offer built-in functions to create multisite with subdomains in localhost. To bypass this restriction, you might need some technical knowledge.
In the meantime, you can create a multisite with subdirectories effortlessly just with simple steps. So, in this guide, we’ll deal with only how to have a multisite network using subdirectories.
Let’s see it in action now!
Step 1: Enabling Multisite Feature
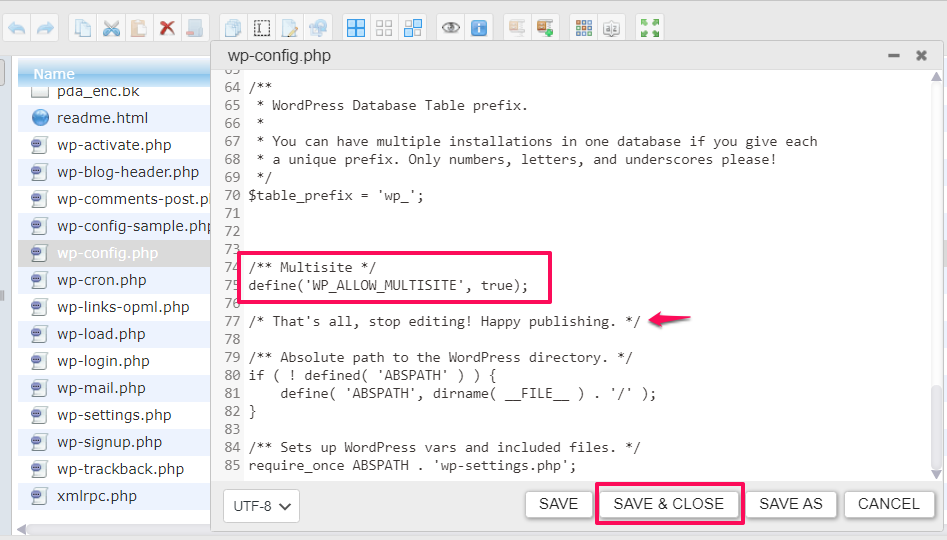
To do this, you need to modify the WordPress configuration: wp-config.php.
You can find this file by logging into your server using an FTP client or simply using plugins such as WP File Manager.
Once opened the wp-config.php file, locate the bit that says:
/* That's all, stop editing! Happy blogging. */
Above the line shown above, add the following code:
/** Multisite */
define('WP_ALLOW_MULTISITE', true);
Once done, press Save and Close then go back to your WordPress to enable the Network.
Step 2: Setting Up Your Network
At this point, a new Network Setup item appears under the Tools section in your WordPress dashboard. Click there and you’ll see the warning message as per the attached screenshot below:
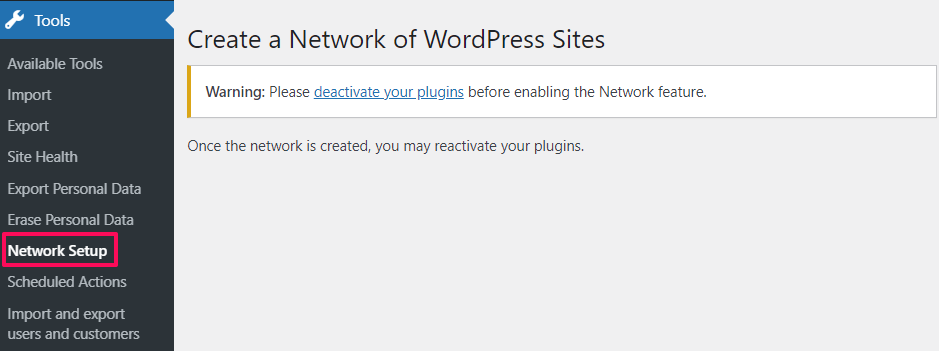
Now, simply navigate to the Plugins section and deactivate all plugins on your site. Let’s use the Bulk Actions to ease your work.
Once you’re done, go back to the Network Setup screen.
Here, choose subdirectories and fill in the details and press Install.
Step 3: Enabling the Network
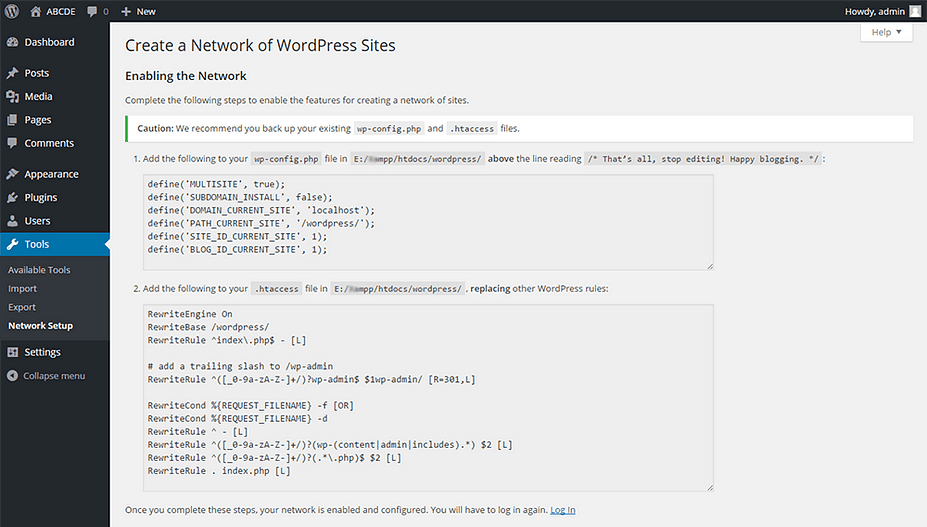
After clicking the Install button, WordPress will generate configuration lines in the wp-config.php and .htaccess files.
#1. Edit Wp-config.php File
Add the following code to your wp-config.php file.
define('MULTISITE', true);
define('SUBDOMAIN_INSTALL', false);
define('DOMAIN_CURRENT_SITE', 'yourdomain.com');
define('PATH_CURRENT_SITE', '/');
define('SITE_ID_CURRENT_SITE', 1);
define('BLOG_ID_CURRENT_SITE', 1);
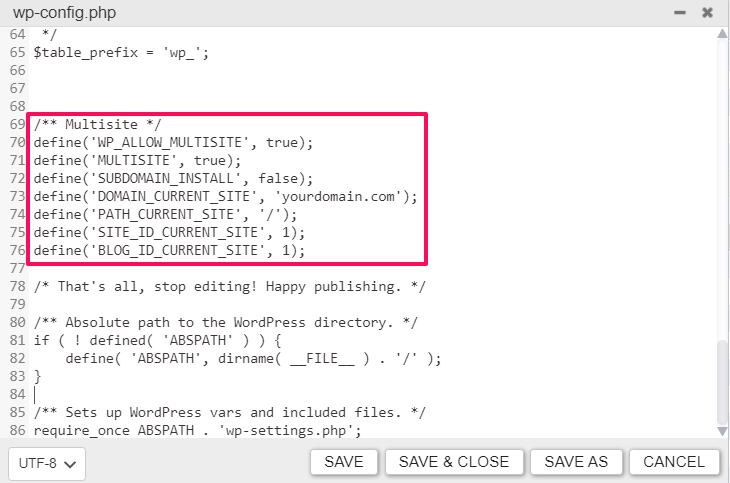
This is what you ended up having in your wp-config.php file:
#2. Edit the Webserver Config
If you run your WordPress site with Apache web server, go back to the SFTP client and edit the .htaccess file. You’ll find the .htaccess in the same path as what you do in the previous wp-config.php file.
If you’re on NGINX, go back to our SFTP, and edit your nginx config file instead.
After inserting the code, save the files and your WordPress Multisite is now successfully installed.
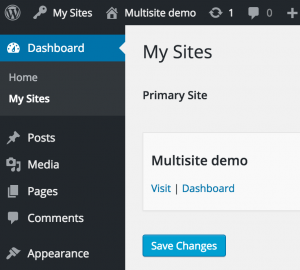
To access your Network Admin Dashboard, you’ll have to login afresh.
After that, you should see the new My sites section:
Step 3: Adding Sites to Your Network
At the moment, you can start creating sites and adding them to your network by clicking through My Sites > Network Admin > Sites > Add New:
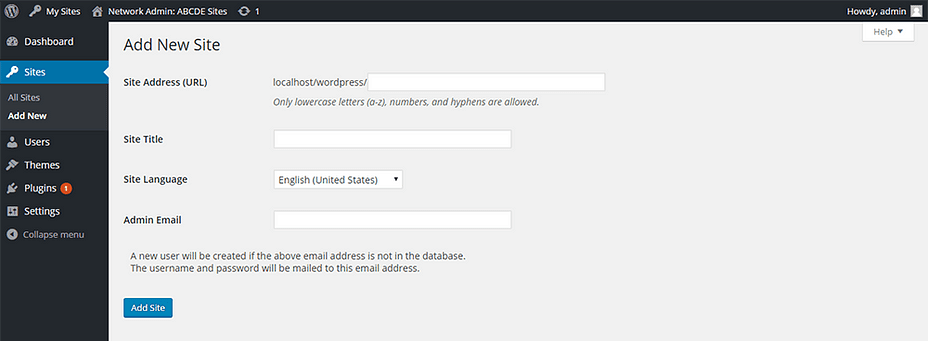
Fill in the details for the individual sites, such as Site Address, Site Title, and Admin Email. Once done, click Add Site.
You can follow the same process to add as many sites as you want. You’ll see all the sites in your Network under All Sites.
Step 4: Adding Themes and Plugins to Your Network
With multisite in place, a Network Admin can install themes and plugins on multisite. These themes and plugins can be activated across the entire network, or selectively on a per-site basis.
Now You Know How to Set Up Multisite on Localhost
We’ve just walked you through steps to set up a WordPress multisite network on your localhost. Now, you can “network activate” themes and plugins to make them available on other “sites” on the network. You can also create/edit sites from within the dashboard.
How does a multisite network benefit your business?
Let’s share with us in the comment section below!
