When implementing big changes to your site’s design and content, or fixing a security issue, it’s necessary to take your site down. To prevent users from seeing a broken website, you should cover it with a maintenance mode page telling visitors why the site is offline and when you expect it to be live again.
In this article, we will briefly explain what WordPress maintenance mode is and reasons to take your site offline. Then, we will walk you through 4 ways to put your WordPress site in maintenance mode.
Let’s go over the definition and a few purposes for WordPress maintenance mode.
What Is WordPress Maintenance Mode?
WordPress maintenance mode refers to a status applied to your WordPress site to inform visitors that the site is temporarily not available. You can display the maintenance mode via a splash page or a message.
The maintenance mode lets you make changes to your site without affecting the user experience. Only specific users have access to the site during this period.
Why Applying the Maintenance Mode for Your WordPress Site?
If you just want to make minor changes on your site such as publishing new content or updating color schemes, it’s not necessary to apply the maintenance mode. However, in case there are security bugs or big changes to the site design, creating a maintenance mode page is highly recommended.
The maintenance mode page helps improve the user experience. They won’t be able to see your incomplete work. Instead, you can show an alert letting them know when the website goes back.
How to Put Your WordPress Site in Maintenance Mode
You can use several methods to take your WordPress website offline. Consider adding code to the functions.php file when you don’t want to get to the .htaccess file on your webserver. In case you want to style the maintenance mode page or customize the message, seek help from a plugin.
#1 WP built-in feature
WordPress takes your site down when you update WordPress core or run themes and plugin updates by default. During this time, WordPress creates a temporary .maintenance file on your site which contains the alert below. The maintenance mode will be deactivated once the updates complete and your site goes back to normal.

Visitors will see the following message during this short period:

This method allows you to put your site in maintenance mode in a few minutes only- until the updates are done.
Your WordPress site might get stuck in maintenance mode
After finishing updates on the site, you’d like to make it live again. However, sometimes, your site might get stuck in maintenance mode for a couple of reasons. It’s because you’ve tried to updates many plugins at the same time which results in a sudden conflict. As a result, the .maintenance file thinks that the updates are still pending.
To prevent this issue, you should:
- Click on the filter Update Available in your Installed Plugins section
- Choose Update in the Bulk Actions dropdown
- Click Apply
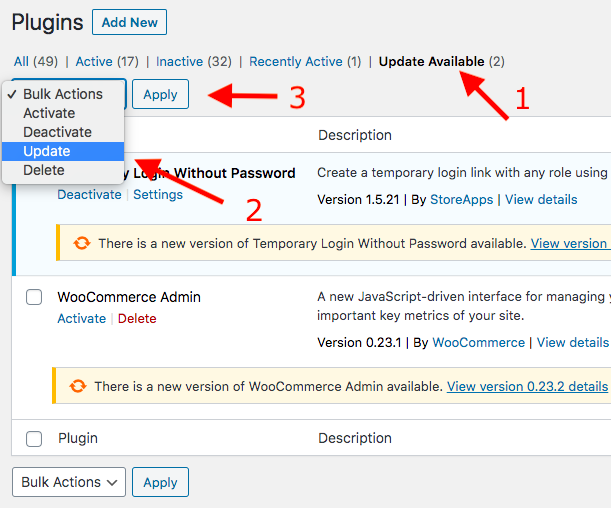
This will help update plugins in orders and you have lower risk to receive a conflict.
#2 Use a custom function
Intend to show a basic maintenance page? Manually add this code to your functions.php file. Follow these steps to open the file add the code there:
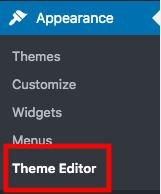
- Head to Themes Editor under Appearance in your WordPress dashboard
- Choose the functions.php file in the Theme Files menu at the right side
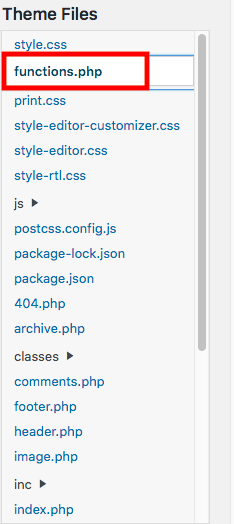
- Enter the following code at the end of your theme’s fucntions.php file:
// Activate WordPress Maintenance Modez function wp_maintenance_mode() { if (!current_user_can('edit_themes') || !is_user_logged_in()) { wp_die('<h1>Under Maintenance</h1><br />Website under planned maintenance. Please check back later.'); } } add_action('get_header', 'wp_maintenance_mode'); - Hit Update File button
You can change the quotes in line no.4 “Website under planned maintenance. Please check back later.” into a custom maintenance message. Users will see this page whenever accessing your WordPress website.

#3 Use .htaccess file
This method requires you to make changes to your .htaccess file in the webserver level. You can find this file in the root directory of your site. Once opening the .htaccess file, copy this code and enter there:
RewriteEngine On
RewriteBase /
RewriteCond %{REMOTE_ADDR} !^123\.456\.789\.123
RewriteCond %{REQUEST_URI} !^/maintenance\.html$
RewriteRule ^(.*)$ https://example.com/maintenance.html [R=307,L]
All the access requests to your site homepage will be automatically redirected to a maintenance.html file now. Replace the number 123\.456\.789\.123 in the third line with your own IP address. After adding the code, accesses to the WordPress admin dashboard will be restricted too.
In case you’re not familiar with coding or making changes to the server, install a third-party plugin.
#4 Enable maintenance mode for your WordPress site with PPWP Pro plugin
Password Protect WordPress Pro (PPWP Pro) primarily comes as a content password protection plugin. You can use the plugin to protect your entire WordPress site as well as individual pages and post from unwanted users.
The plugin also allows you to put your site in maintenance mode via a password form. As a result, users have to enter the correct password in order to view any pages on your protected website.
For other maintenance mode plugins, it’s possible for you to style the page with different layouts. PPWP Pro, meanwhile, secures your site content while improving the user experience.
To apply the maintenance mode with the plugin, you need to install it to your WordPress site, customize the password form message, then set a password to protect your site.
- Download PPWP Pro plugin
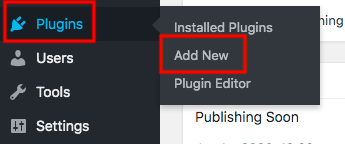
- Go to Add New under Plugins in your WordPress navigation menu
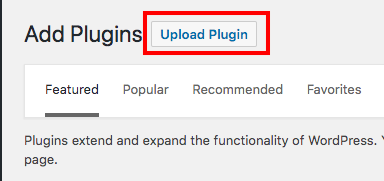
- Click on Upload Plugin and select the zip file you’ve downloaded
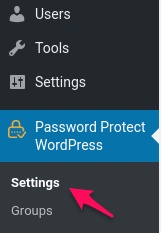
- Visit the plugin Settings page
- Scroll down to the PASSWORD FORM section and edit the form message

The default one (1) is “This content is password protected. To view it please enter your password below:”. You can change it into “The website under planned maintenance. Please enter the correct password to view it”. - Save your changes
- Head to the Entire Site tab
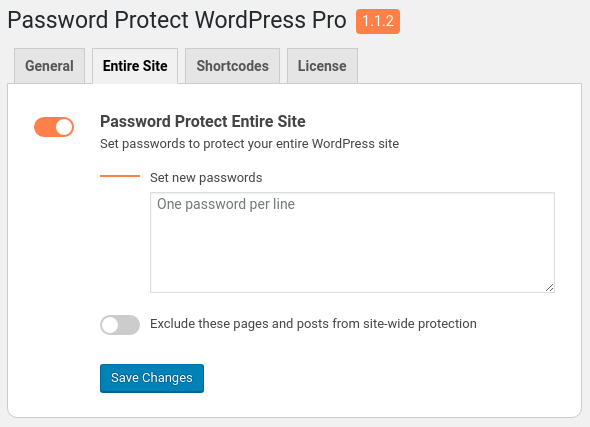
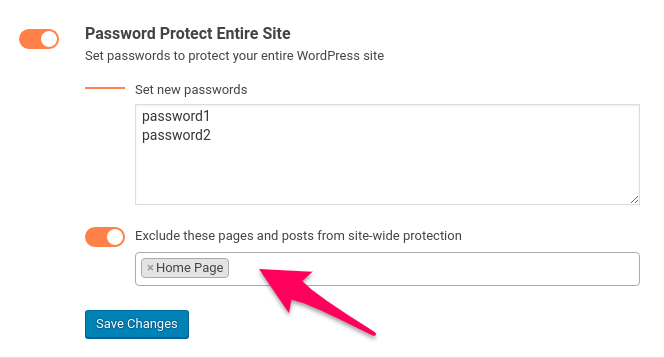
- Turn on the Password Protect Entire Site option
- Enter your desired password. You can set as many passwords as you want to.
- Click Save Changes
Your maintenance mode site becomes private now. Only team members like editors or web designers with the correct passwords are able to open it.
Exclude specific pages from maintenance mode
PPWP Pro enables you to selectively exclude some pages from maintenance mode. In other words, these pages will become accessible to the public while the rest of the website will be private.
- Switch on the option “Exclude these pages and posts from site-wide protection”
- Select your desired pages and posts from a dropdown list
- Save your changes
Make Use of WordPress Maintenance Mode
WordPress maintenance mode proves useful to shield your underdevelopment site while improving the user experience. Users will have no chances to see your broken website.
You can use different solutions to take your site offline. When updating WordPress plugins and themes, the site will be briefly unavailable. Visitors can reaccess it in a few minutes.
Add code to the functions.php file or the .htaccess file if you don’t want to install a plugin. In fact, these methods are not really easy for the non-tech savvy.
It’s best to use the PPWP Pro plugin to easily put your site in maintenance mode and protect the content at the same time. You can secure your new content while still inform users about the status of your site.
What is your solution to put your site in maintenance mode? Let us know in the comments below!
