
There are times where you may want to restrict public access to the premium content on your website. This could be your family’s private blogs or your portfolio, which is only accessible to certain people.
At this point, password protection seems like an ideal solution. The usual workflow looks something like this: You password protect your private pages, and share the passwords with authorized users.
But did you know that there are more optimized ways to grant access to your protected pages?
When will you need to bypass password protection?
There are many situations where you need to give users direct access to your premium content without requiring them to enter a password.
Promotion programs
Imagine you sell digital products. This August, you want to run a promotional program on your website for loyal customers. You intend to offer discounted products for a limited time.
What is the best way to do this? Can you protect the page with the discounted products with a password, and then grant access to those who have the correct access code?
Instead, a better idea is to send them direct access links or have their user roles whitelisted so they can access your private product pages.
This way you can prevent them from entering incorrect passwords and missing out on the chance to buy discounted items.
Portfolio pages
As a freelancer or web designer, you make your portfolios available online, but they may only be shown to your clients. In this case, password protection is just the thing.
However, you should not let your potential clients enter passwords to access your portfolios. This does not provide a good user experience.
In these circumstances, it would be much easier if you sent your potential clients direct access links. Just one click and they can see your portfolio.
Under development websites
What would you do if your websites are not yet ready to be viewed by the public and you want to hide all development work from the public eye? The best solution to protect the entire site from public access is to use password protection.
This way, all users who access your website under construction will be prompted for a password form. You can allow administrators, editors or other roles you want to see your site in the front end without entering passwords. This saves you having to enter passwords when previewing your articles in the frontend.
How to handle password-protected pages with WordPress
If you’re looking for a way to bypass password-protected WordPress pages, there are various ways to do this using code. However, for the average WordPress user, they’re probably going to be too complex.
For this reason, it’s best to use a plugin like Password Protect WordPress Pro (PPWP). With the PPWP Pro plugin, you can create quick links for all content types, i.e. for the entire site, individual pages and content sections.
You can also whitelist specific roles to access your premium content without having to enter passwords.
Bypass WordPress password protection with quick access links
A quick access link (QAL) is a page URL that contains an access token. While you have to enter passwords to access original page URLs, clicking on QALs takes you directly to the premium content.
These links offer users a much better user experience. For example,
Original URL: https://passwordprotectwp.com/demo/protect-pdf-files-from-downloads/
QAL: https://passwordprotectwp.com/demo/protect-pdf-files-from-downloads/?ppwp_ac=eyJwYXNzd29yZCI6InBhc3N3b3JkcHJvdGVjdHdwIn0=
Let’s look at the steps to create QALs for your premium content, assuming you already have the PPWP Lite and PPWP Pro plugins installed.
Step 1: Protect your private content with the PPWP Pro plugin.
To do this, simply navigate to the Pages, Posts or Custom Post Types sections. You will see a Password Protection column.
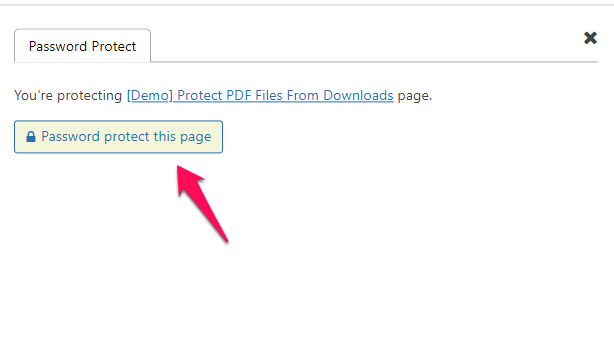
Click on the “Manage passwords” button to open a pop-up window where you can protect your pages with just one click.
Step 2: Create passwords
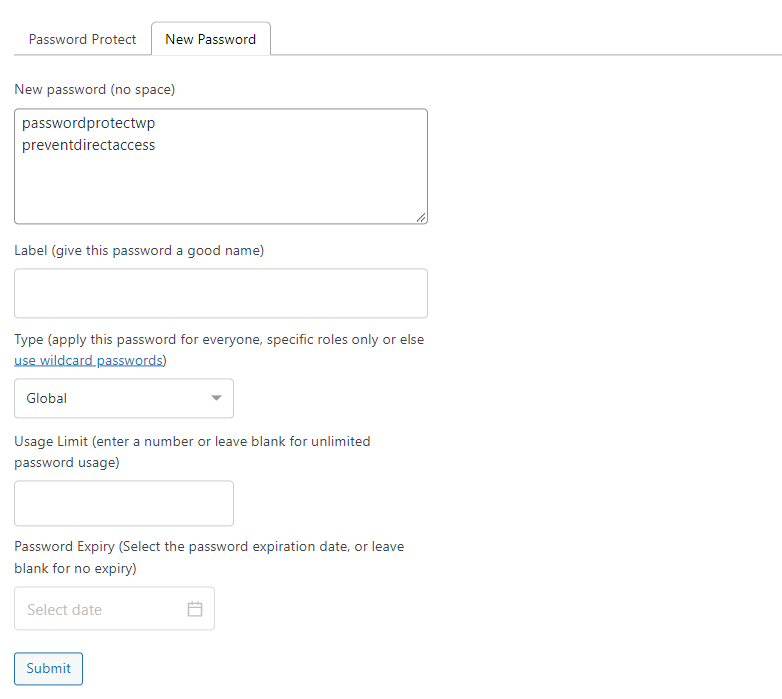
After you have clicked on the “Protect this page” with a password” button, a new screen will appear where you can create new passwords and manage existing passwords.
To create new passwords, you can click on “Generate new passwords” automatically” or switch to the “New password” tab to create your own passwords.
Step 3: Copy QALs
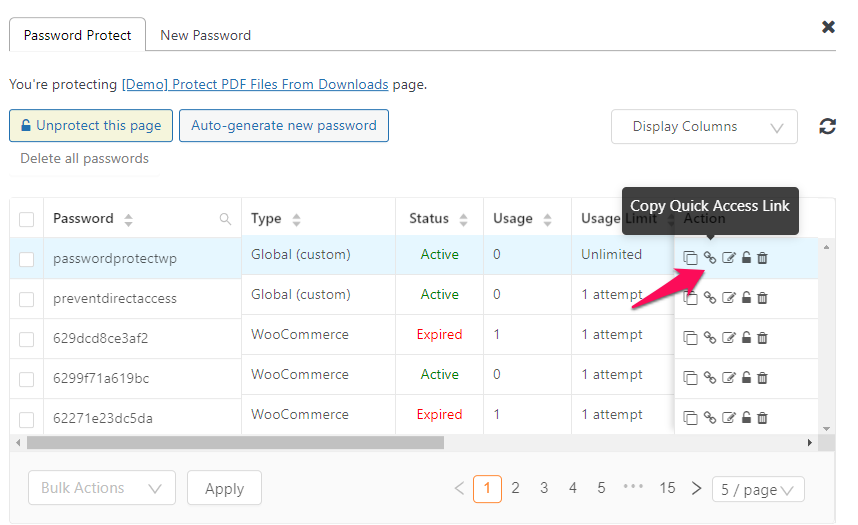
Each password created is linked to a QAL.
To copy QALs, click on the icon as shown in the attached screenshot.
For more information on creating QALs with PPWP Pro, see the video tutorial below:
Whitelist WordPress user roles Access to password-protected content
In addition to QALs, you can bypass password-protected WordPress pages with the PPWP Pro plugin by using whitelisted roles.
PPWP Pro offers features that allow you to give users who have logged in to your site with specific roles access to protected content without having to enter passwords.
The feature works if you want to give admin users or editors easy access to premium content in the frontend.
All you need to do is:
- Password protect your pages with the PPWP Pro plugin
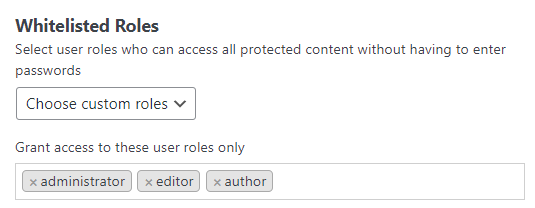
- Allow specific user roles direct access to your pages by whitelisting roles on the PPWP Pro settings page.
Bonus tip: Whitelist IP addresses for access to entire pages
What if you want to create an intranet website that can only be accessed by those who come into your office? Should you use a membership plugin?
Not necessarily, as the PPWP Pro plugin can handle this for you. To do this, go to the Sitewide protection section of the PPWP Pro plugin.
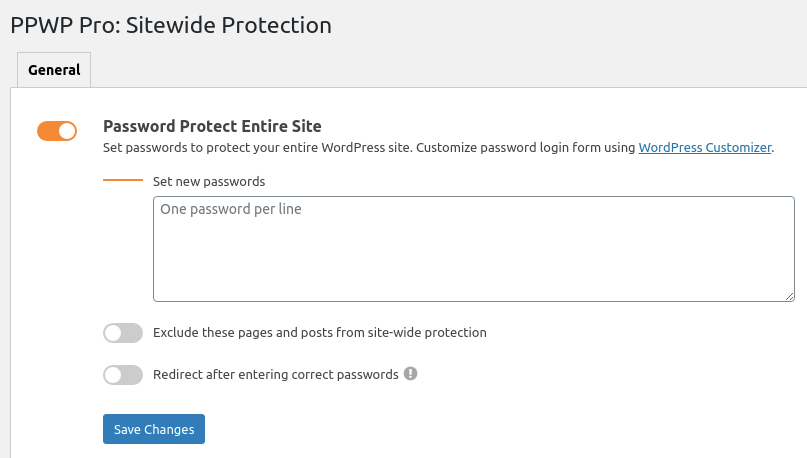
Here, you can choose to grant specific IP addresses access to your protected site with a custom code.
Conclusion
Quick access links take password protection to a higher level. Our PPWP Pro plugin helps you manage this hassle with a user-friendly interface. All you need to do is copy the QALs associated with the created passwords and send them.
This way, your users simply click on the links to access your premium content. You no longer need to memorize passwords or struggle with the problem of forgetting passwords. You can also grant users access to your protected content by whitelisting their roles or IP addresses, so be sure to choose the option that’s best for you.
