Have you ever wondered it would be easier if you can send a temporary access link to a specific group of users? Actually, creating a one-time login link for your protected content is one of the smartest methods to manage your content that not all WordPress site owners know how to do.
Following this article, you will know how to use the best WordPress password protection plugin to secure your pages and posts as well as creating quick access links for those content.
- When Should You Provide a One-time Login Link
- How to Create One-time Login Link
- Grant One-time Access to Child Page
When to Provide a WordPress One-time Login Link For Your Users
There are some situations where you might consider sending a quick login link for your users.
- Users need access to certain private pages and posts frequently
Some of your private content, including the premium blogs or customer-specific product pages, receive a lot of visits every day. It’s convenient for users if you can provide them with a quick access link. They can click the URL and view the content without having to enter passwords.
The link will be expired after one-time usage to prevent link-sharing and unauthorized access.
- You send a welcome email to new subscribers with the link to the content
You offer private content and require users to subscribe in order to access it. Instead of sending them both password and the link to the protected article, you just need to include a quick access link in the email.
It means your users can click on this URL and read the blog directly. It helps save their time from copying and entering the password into the password form.
- You hold an invitation-only event
In addition, when you hold an event to which only VIP members can attend, the special quick access links will show them they have privileges that not every other user role can get. The one-time-use link will allow them to enter the content immediately without the interruption from the password message.
How to Create One-Time Login Link for WordPress Protected Content
Password Protect WordPress Pro proves one of the best solutions to protect your content with passwords. You can secure every single page, post, custom post type, and category with just one click.
On top of that, the plugin allows you to generate one-time access links for protected pages and posts and send these special URLs to users.
The 9 simple steps below help you get started and use the plugin easily:
- Download the Password Protect WordPress Pro plugin
- Head to Plugins → Add New → Upload Plugin and open the zip file you’ve just downloaded
- Install, and enter the license key sent to your mailbox then activate the plugin
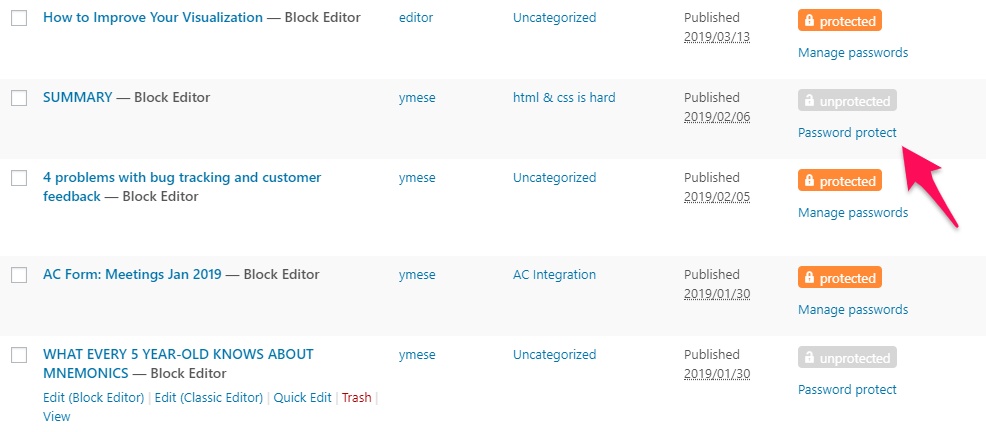
- Find your desired post or page in the WordPress Admin dashboard
- Click “Password Protect.”

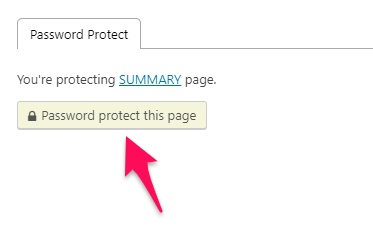
- Hit “Password protect this page” in a password management popup

- The plugin will automatically create a new password to protect your page. You also see other password-related settings in the window too.
- Click on the icon “Copy access link” under the Action column

- Set the access link usage to 1 time
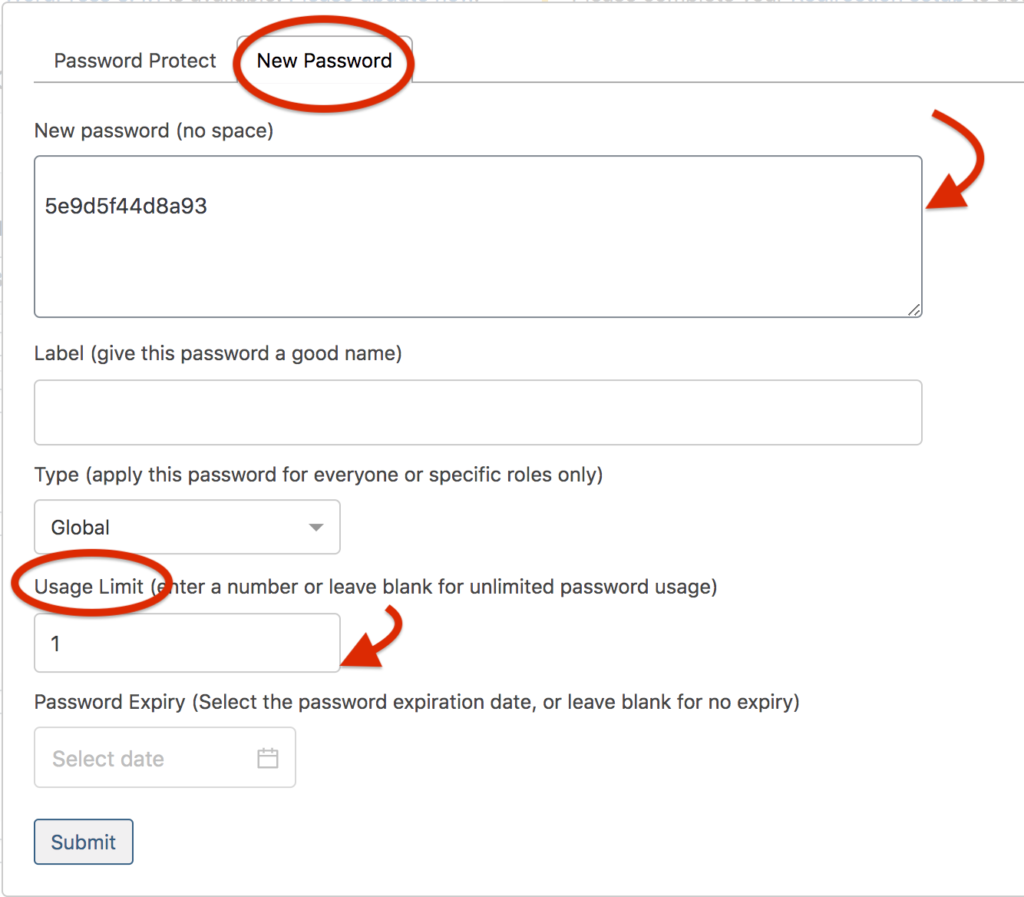
Now switch to New Password Tab, copy the password that the plugin just generated for you, or you can create a new one by yourself, and put it in the New Password box.
Under Usage Limit, put the value to 1 so that the password along with the quick access link will be limited to one-time use only.

Pretty simple, isn’t it? Within one minute, you can protect your content from unwanted users as well as generating a quick access link to send to your desired members.
This method works for individual pages. If you protect a parent page containing child pages, you might wonder whether the child pages will inherit the features from its parent as well.
Grant One-Time Access to Child Pages
Child pages can be protected individually as an independent page. If you protect it in this way, you will need to copy every access link for every child page.
You sometimes find it more convenient to protect the parent page as well as its child pages at the same time. Password Protect WordPress Pro enables you to secure a parent page and subpages with a password via the feature “Password Protect Child Page”.
After protecting the parent and child pages, you can go back the step 9 above to set the usage limit of the password and access link to 1.
However, you still have to create one-time quick access links for each child page manually. Luckily, it’s not that complicated.
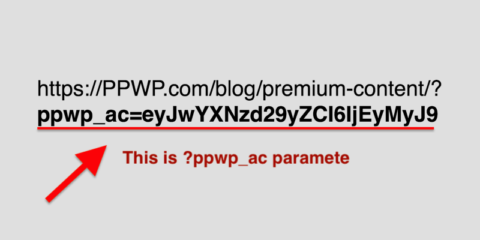
Simply copy the ?ppwp_ac parameter from the parent page’s access link and paste it into the child pages’ URL.

For example:
Your parent page one-time access link is: https://PPWP.com/blog/parent-page/?ppwp_ac=eyJwYXNzd29yZCI6IjEyMyJ9
Then your child pages access links will look like this:
https://PPWP.com/blog/parent-page/child-page/?ppwp_ac=eyJwYXNzd29yZCI6IjEyMyJ9
Once your users get the one-time access link to the parent page, they will be able to see its child pages too. Any other user roles without this temporary access link or try to access via the original URL, they cannot see the protected content.
Please note that if you set the same password for two different pages or posts, they will share the same ?ppwp_ac parameter. So whichever content your members access first, they still need to re-enter the password to see the other one.
The one-time access links are connected with your password of specific content. So whenever you make any changes to the password, you are also making changes to the access link as well. For example, if you change or deactivate the password, the access link will be changed and deactivated accordingly.
Safety for Your Website, Convenience for Users
Password protect content to make it invisible to nonsubscribers comes as the best way to secure your hard-to-produce works. But there are some exceptional cases in which you want to give some specific group of users a privilege to enter the protected content without even entering the password.
Installing Password Protect WordPress Pro now to protect sitewide and at the same time give out quick access links of your desired posts and pages to specific users.
Let us know if you have any questions relating to this topic in the comment section below.
