
Almost all website owners want to attract high traffic to their sites. Writing quality content, targeting popular long-tail keywords, as well as optimizing both on-site & off-site SEO. You’ve probably done the same too.
Still, in some circumstances, you may need to keep users’ eyes off your site. It can be a website in maintenance mode, a private blog, or an internal network. In these cases, you’ll need to unpublish your WordPress site content and hide it from the public by all means.
There are several methods to close your WordPress site. Setting up a coming soon page informs visitors that the site is unavailable at the moment. You can also password protect your website’s directories at the server level.
You may be surprised how easy it is to turn published pages, posts, and even the entire website into private. Let’s discover 3 other options to keep your WordPress content temporarily inaccessible to the public.
- 4 Ways to Unpublish WordPress Pages, Posts, and Custom Post Types
- How to Unpublish Entire WordPress Site with and without Plugins
Unpublish WordPress Pages, Posts, and Custom Post Types
Many site owners avoid deleting pages and posts permanently for a couple of reasons.
It may be because your content was published a long time ago and has become outdated now. Besides, when you no longer provide a particular product or service, hiding all related content is necessary.
Rather than completely deleting these pages and posts, consider unpublishing them so you can reference or reuse in the future.
Plus, removing pages seriously hurts your site’s SEO. It takes time for search engines to recognize that the page is not available and deindex it. Consequently, users still find your content on search results but will end up viewing a 404 not found page. This hugely affects their experience.
Unpublish Pages & Posts Using WordPress Default Visibility
WordPress comes equipped with a default feature allowing you to switch published posts to private or draft mode.
Take these 6 simple steps to quickly unpublish your WordPress pages and posts right on the content editing screen.
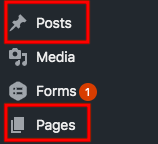
- Head to Pages or Posts section in your WordPress admin dashboard
- Open your desired post
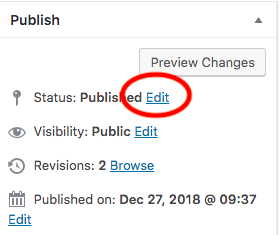
- Look for the Publish box in the edit screen
- Click Edit next to Published Status
- Select Draft option
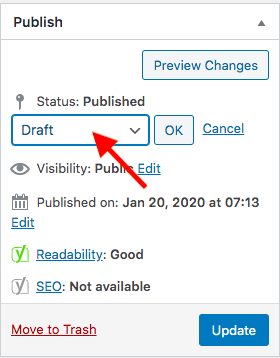
- Update your post
Your WordPress content now becomes inaccessible to the public, except the website admins and the post author.
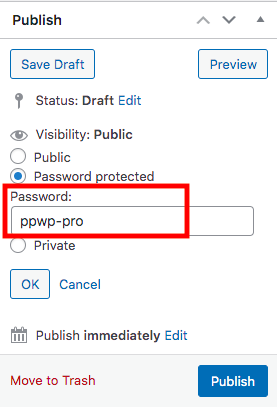
One thing to keep in mind is that changing a published article back to draft status may provoke a sudden drop in ranking. To avoid this, you should password protect your content or switch it to private mode.
The former allows you to create a password for your content manually. The latter, meanwhile, turns your posts to a 404 not found page when users access it without permission.
Hide Pages and Posts Using PPWP Plugin
WordPress default feature gives you pretty basic and minimal control over the page visibility. It lets you lock the content with one password only. What’s more, you’re incapable of protecting pages and posts by user roles. That’s where an advanced password protection plugin comes in handy.
Assisting over 20,000 WordPress users with content protection from pole to pole and receiving a 4.8-star rating on the WordPress repository, Password Protect WordPress (PPWP) is your must-try plugin.
This free solution enables you to cover your WordPress content under a password form. On top of that, you’re able to lock the content with one or multiple passwords by user roles. As a result, only logged-in users entering the correct passwords are permitted to open the post. To get started using our PPWP plugin, you need to:
- Click Add New under Plugin in your WordPress admin dashboard
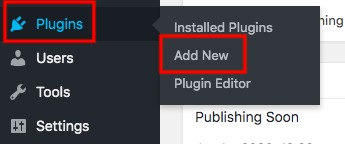
- Type “password protect wordpress” in the keyword box

- Install and activate the plugin
- Visit the Pages or Posts section and edit your post
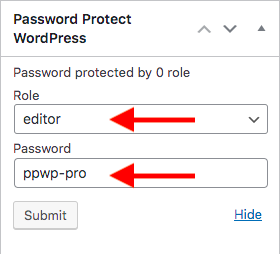
- Look for the Password Protect WordPress option
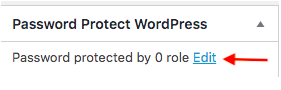
- Select a user role from the Role dropdown list
- Enter your password and submit
- Update the post
The following video will help you quickly visualize the steps above:
Unpublish WordPress Custom Post Types with PPWP Pro
In case you want to safeguard custom post types such as WooCommerce products, reviews, or demo pages, give our PPWP Pro a try.
You can unlock tons of advanced features to unpublish your WordPress site. The plugin makes it easy for you to auto-generate new passwords, set expiration times, and manage all these passwords in one place.
The detailed guide below will show you how to use this plugin:
- Download our PPWP Pro plugin, install, and activate it
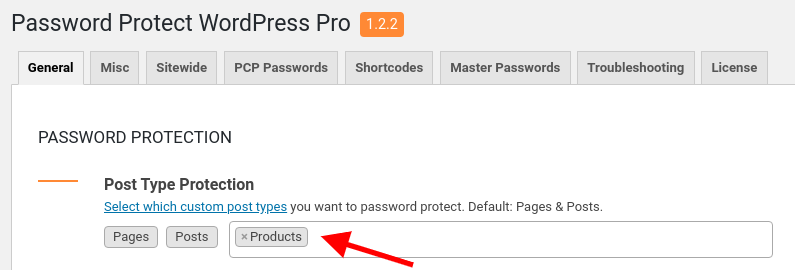
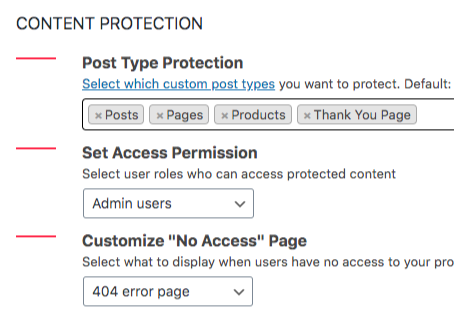
- Go to Settings under the Password Protect WordPress section in your admin area
- Select your post types in the Post Type Protection option and save your changes
- Open the custom content you plan to protect and click Password protect
- Auto-generate new passwords or create your own ones
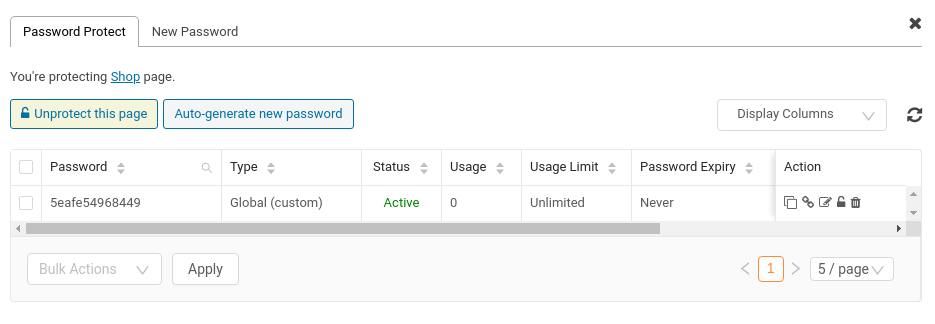
PPWP Pro sheds light on password limits and expiration. In other words, you can decide when your passwords become expire based on time or usage. The Action column in the management popup allows you to easily copy, edit, deactivate, or even remove your password.
Out of the box, each password will have a Quick Access Link enabling users to bypass the protected content without having enter passwords.
Secure Your WordPress Content with PPP Plugin
Protect WordPress Pages, Posts, & Custom Post Types, aka PPP plugin, comes as another simple yet effective solution to hide your content.
While PPWP Pro locks content with passwords, PPP secures their original links. Unpermitted users will be redirected to a 404 not found page when attempting to access them via their original URLs.
You can grant users access to these private content by generating access links.
Here is how to get started with the plugin to unpublish your WordPress pages, posts, and custom post types:
- Install and activate the PPP plugin
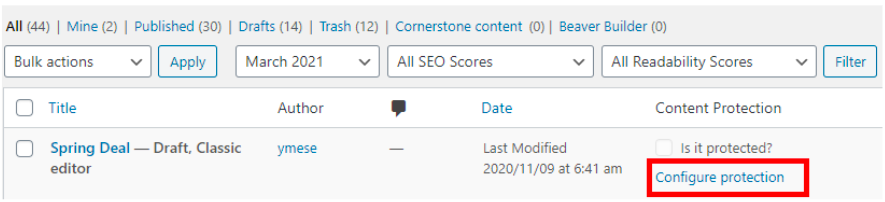
- Click on the Content Protection option on your admin menu
- Select the post type you intend to protect. “Pages” and “Posts” are added by default.
- Open the content you want to protect, hit Configure protection, and press Protect this post button
- Select user roles that can access your private content, e.g. admin users only
- Generate a new unique access link for your content automatically or customize your own one (optional)
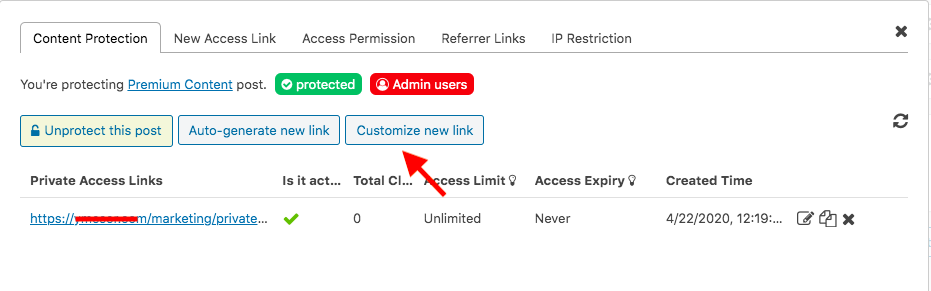
Anyone, with the correct access link, is able to view your secure content now.
Avoid publishing content accidentally
Some people make their content visible to the public accidentally. Consequently, they have to find ways to hide it. It would be even worse if Google already indexed your posts and show them up on search results. When you take the posts down, visitors will see a 404 not found page. This affects a lot to your brand as well as the user experience.
To stop yourself from accidental publishing, you can install a publish confirmation plugin for better publishing management. Upon application, a message will display and ask for confirmation whenever you hit the Publish button.
How to Unpublish the Entire WordPress Site
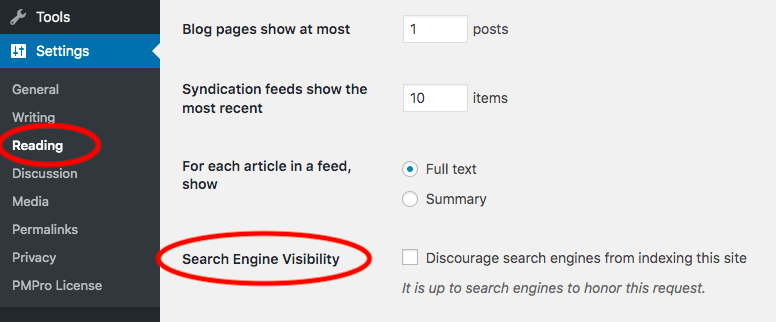
It’s possible for you to shut your whole site down by discouraging search engines from indexing it. Simply tick the Search Engine Visibility option under your WordPress Reading settings. Your website will no longer appear on search results.
However, we never suggest using this method due to its limitations. Your content will still be indexed if it’s linked from other sites.
Additionally, it destroys your site SEO significantly. You’ll lose almost your current rankings and the SEO effort that has been put into the website previously.
To effectively hide or unpublish the website, you should use other methods such as entire site password protection or “noindex” meta tag.
The PPWP Lite plugin helps secure single pages and posts as well as the whole website. You can protect your entire site with just a few clicks.
- Head to the Password Protect WordPress icon on your navigation menu → Sitewide protection
- Enable the Password Protect Entire Site option
- Enter your password
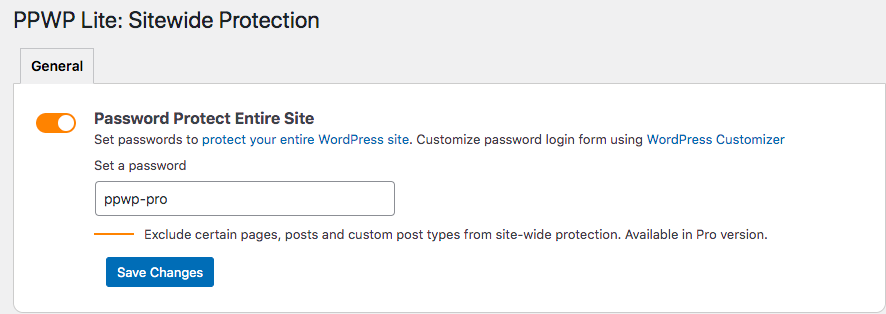
- Save your changes
Not only the website is locked with a password but the plugin also discourages search engines from indexing the site by default. Visitors won’t be able to find your site or access it on any search engines even if they have the direct URL.
In case you plan to generate multiple passwords for your private site, make use of its Pro version. The PPWP Pro enables you to set many passwords, and at the same time, redirect each user to a different page based on their password.
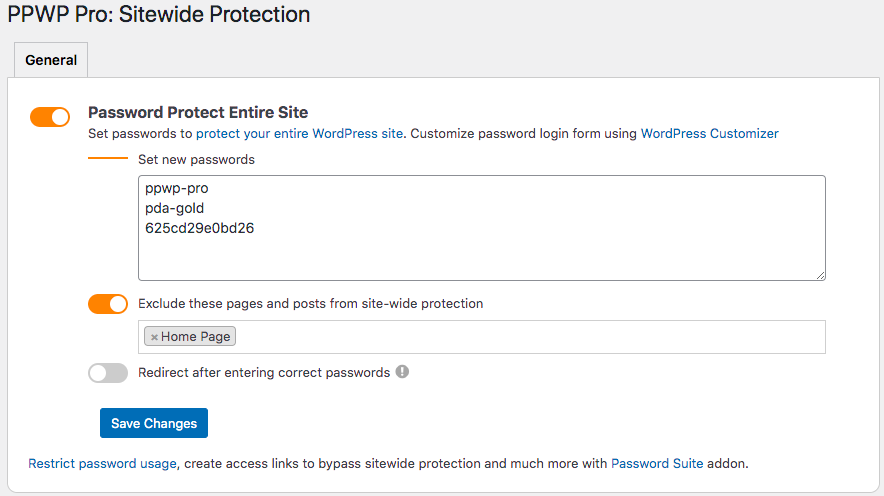
On top of that, the plugin gives the go-ahead to exclude specific pages from the sitewide protection. Instead of hiding everything, you can make the ‘Contact us’ or ‘Announcement’ page available to let visitors know what happens to your site and who they should get in touch with.
Ready to Unpublish Your WordPress Site?
Hiding a WordPress site from the public’s eyes is no longer a complicated task if you find the right method. Just want to hide some pages or posts? Turn them to the Draft mode in the post edit screen. You can also make it Private so that only Admins can view the live content.
You should make use of our PPWP Pro and PPP plugins to effectively unpublish your WordPress content. PPWP Pro allows you to lock content with passwords. PPP, on the other hand, shield pages, posts, and custom post types by protecting their original URLs.
Intend to unpublish the whole website? Let PPWP assist you.
Download PPWP Pro and PPP plugins and have your WordPress site content unpublished today!
