You might more than once come across some famous websites such as Best Buy, Zara, or Forbes, and see a splash page appearing instead of their homepage. Those pages are designed to redirect you to a certain topic of the website or simply inform you of some notice before entering.
A splash page is becoming more familiar on the Internet these days thanks to its precise information and convenience that help users navigate to the desired destination on the website faster.
Today, you will learn more about what a WordPress splash page is, what you can use it for as well as how to create and exclude it from your private site.
- What Is a WordPress Splash Page?
- What Is Splash Page Best Used For?
- How to Create a Splash Page?
- How to Password Protect Your Website without Affecting Splash Page
- Having a Nice Welcome Page for a Hard-to-Break-in Website
What Is a WordPress Splash Page?
When visiting a website, a splash page or a static page is the first thing you’ll see rather than the website’s home page. It acts as a welcome page or a teaser to get the attention of the audience for a certain purpose.
Different from a landing page, a website splash page contains an exit link that allows users to go straight to the homepage then visit other pages. Meanwhile, the ordinary landing page tends to keep users stuck to the page to make a purchase.
A typical splash page has a unique visual; it may be even different from what the website theme looks like. The first impression is important; therefore, it’d better look catchy enough to attract users. A high-quality background image or a creative illustration is well recommended. Just don’t put a video here because it may slow down the website performance.
Also, the copy on the splash page is normally short, simple, and easy to understand. Since it’s not a part of your website and just created to transfer a defined message, it should be action-oriented. Nobody wants to read a whole long paragraph right after accessing the website and fail to reach the homepage.
What Is Splash Page Best Used For?
Back then, a splash page was mainly used to inform users to download Flash Player for better website visiting experience, but its purpose is way more than that now.
A lot of websites use a splash page to inform users about:
- Age verification to access the website
- Email entering for discount code, newsletter, and a free ebook, etc..
- Language and location options
- Occasional/special sales
- New product announcement
Visiting online store websites near Black Friday, you will recognize the effectiveness of these splash pages. It lets you know what kind of offer you’ll get from the store as well as redirecting you to that sale page immediately without navigating it from the homepage.
However, some people underestimate the splash page and don’t think it is necessary for their websites. Actually, a good splash page will show how professional your website is and attract new users better. Just like Zara and Best Buy, any users who access those websites with a foreign IP address will see the splash page asking for a language and location selection to direct them to the local stores.
This sensitive thing will impress the customers and express how much you care about the visitors’ experience along with how often your website is updated.
How to Create a Splash Page
To help you get rid of getting confused from the coding process, this article will introduce a useful and free plugin. With this tool, you’ll find creating a splash page is a piece of cake.
First thing first, you need to find the Elementor plugin from WordPress.org and install it. Actually, this page builder is so familiar with WordPress users and maybe some of you already have it installed on your sites, but didn’t know it can create a splash page as well.
Step 1: Create a new page
Create a new page as normal. In your Dashboard settings, find Page → Add New.
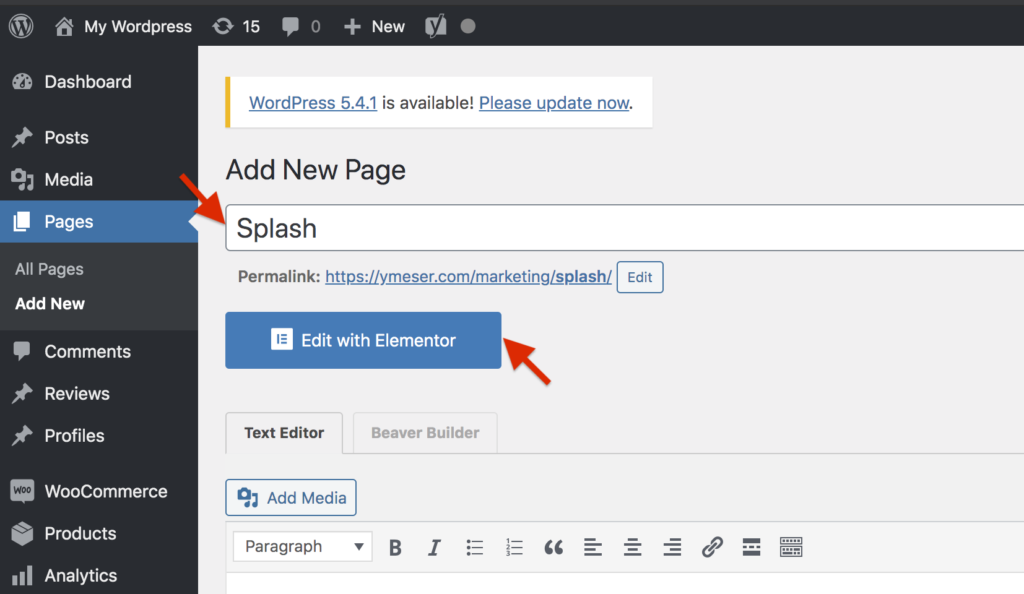
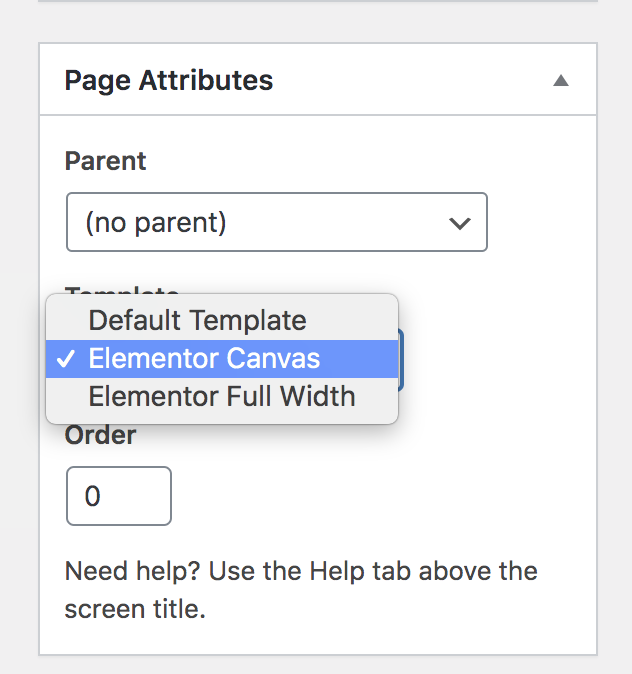
Name this page “Splash”. On the right side, find Page Attributes, under Template choose Elementor canvas.
Then, click Edit with Elementor to start designing your new splash page.
Step 2: Design your splash page with Elementor
After allowing your post to be edited with Elemntor, the new settings page from Elementor will appear with a lot of options.
Click on the Add New button to choose a page template you would like to assign to your splash page.
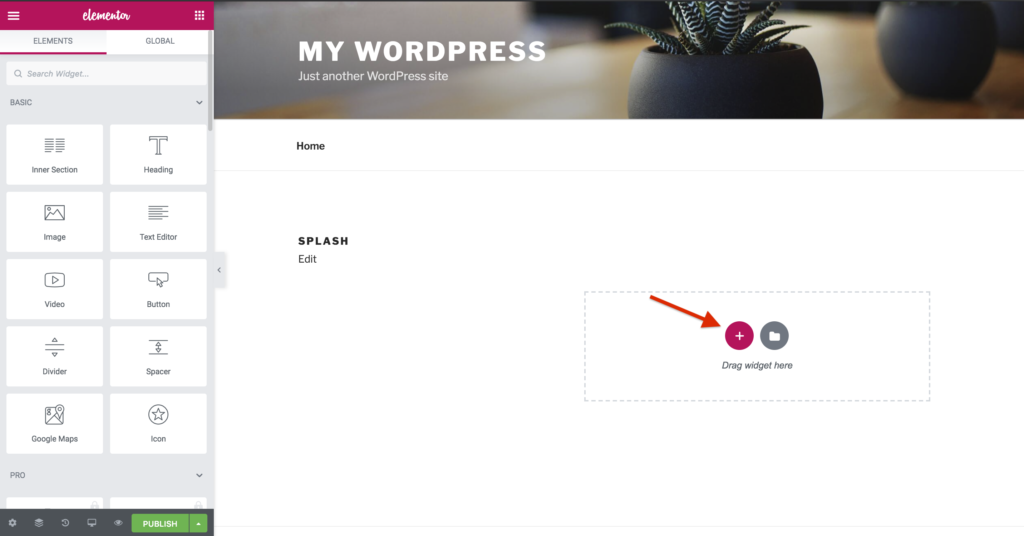
After that, you just need to drag and drop whatever element you want to add to the splash page such as image, headline, or button.
This is how our sample turns out

The process is much easier than you might think. With the free version, the plugin offers you several choices for a useful splash page or any page builder settings. Remember to display a smart caption to attract customers to click on your call-to-action link.
The fact is, nowadays, most of the WordPress websites have protection for certain pages, posts, or even the entire site. The most common type is the password-protected content.
What if you are using a protection plugin but don’t want it to protect the splash page? Password Protect WordPress plugin is what you are looking for.
How to Password Protect Your Website Without Affecting Splash Page
Password Protect WordPress Pro provides advanced features to protect pages, posts, custom post types, or the entire site.
Simply click on Password Protect right inside the Page/ Post settings, and that particular content will be protected immediately with the new strong password autogenerated by the plugin.

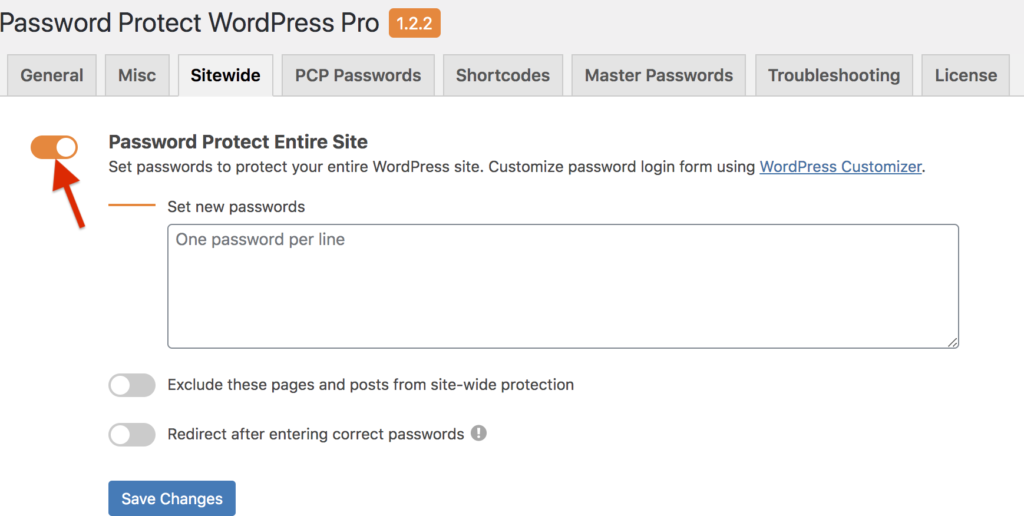
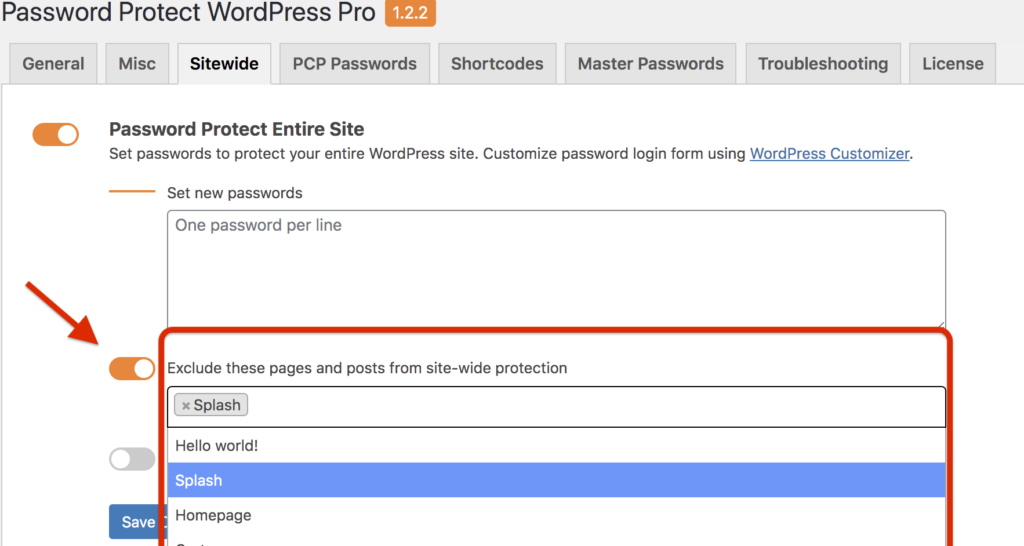
In case you want to make your whole site private and but visible to subscribers or paid-members only, you can consider password protecting the entire site.
Under Password Protect WordPress plugin settings, find Sitewide. You just need to enable Password protect entire site, and add your desired passwords to the box.
How about your splash page? You use the splash page to entice or inform new users about the page’s main theme. You, of course, don’t want this page to be hidden from them like other pages.
Here’s the point: Password Protect WordPress allows you to password protect the entire site and exclude one or multiple pages/posts at the same time.
The drop-down below lists out all of your pages and posts, and you can choose any content you want to be visible.
So now, you don’t need to worry about your website being vulnerable to the general public, especially unauthorized accesses. Once you have your site password protected, only specific roles or users who get the right password can see the content. Others will be redirected to the 404 error pages.
But still, for pages and posts created to serve the general users, you are totally able to exclude them from the protection.
Having a Nice Welcome Page for a Hard-to-Break-in Website
Presenting a splash page, or a welcome page helps your website stand out compared to other businesses, especially in this fierce e-commerce market.
It takes a few minutes to create a splash page with our easy-to-follow instruction. This minor change will help enhance your reputation and positively affect users’ evaluation of your website. In fact, several big prestige websites have splash pages and update them frequently. It doesn’t hurt to apply one on your WordPress site.
Also, protection is important as ever. No matter what, you always need at least one plugin to protect your content. Password Protect WordPress is a good plugin that is recognized by experts as the number one password plugin in the WordPress repository.
Besides providing functions to password protect pages, posts, categories, the plugin also allows you to exclude, and bypass the password protection of certain content based on user roles.
What’s more? Elementor and Password Protect WordPress work wonderful together. This combination will bring you the most powerful support in improving and protecting your website.
Let us know if you have any questions about the splash page creation and content protection in the comment section below.
